
Golden Russian Honey Cake Recipe for Sweet Bliss
Sweet memories of childhood bakeries flood my mind when I think about this delightful russian honey cake, a dessert that whispers stories of warmth and tradition.
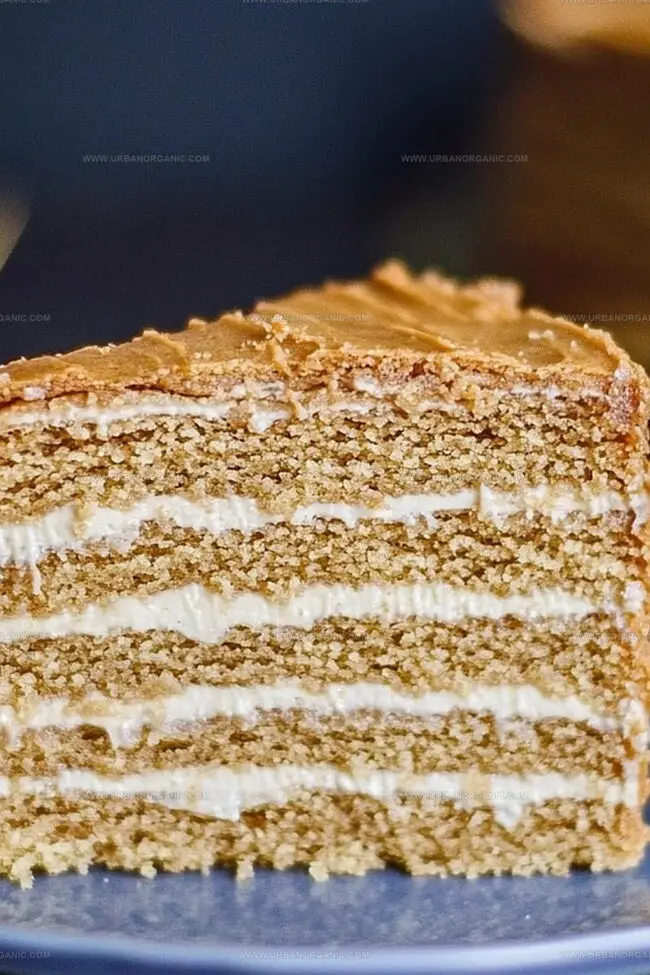
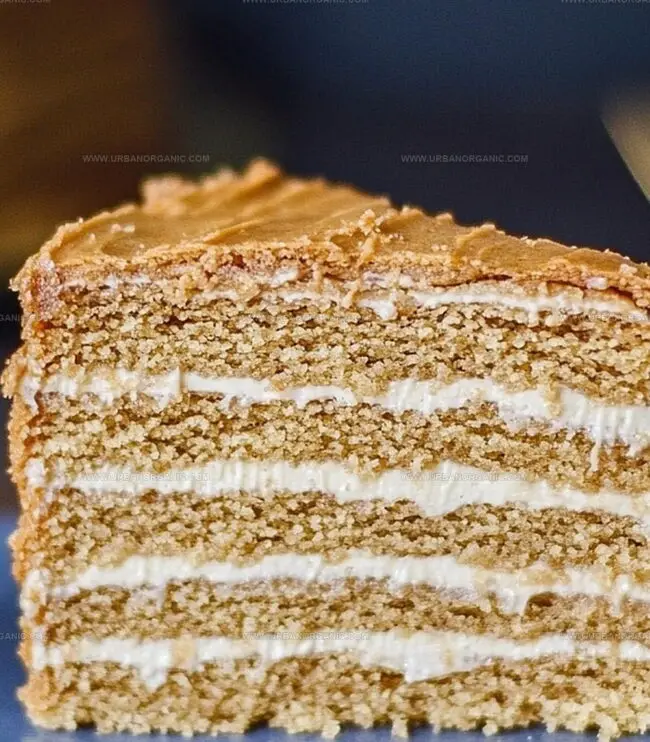
Layers of delicate golden-brown cake meld perfectly with creamy frosting, creating a symphony of flavors.
Fragrant honey infuses each bite with richness that feels both comforting and elegant.
Generations of bakers have treasured this recipe, passing it down through whispered kitchen secrets.
Soft, intricate, and surprisingly simple to prepare, this cake promises a delectable adventure for anyone willing to explore its nuanced textures.
Mixing ingredients becomes a joyful dance of culinary creativity that you’ll find utterly irresistible.
Bake this cake and watch magic unfold right before your eyes.
Why Russian Honey Cake Is Worth Trying
Ingredients Needed for Russian Honey Cake
Primary Cake Base Ingredients:Honey Group:Leavening Agent:Cream Filling Ingredients:
Cream Base:Sweetening Agents:Flavor Enhancer:Decoration and Finishing:Making Russian Honey Cake in Your Kitchen
Step 1: Prepare Honey Mixture
Melt honey, sugar, and butter in a saucepan over medium heat. Stir until completely smooth and combined.
Step 2: Incorporate Eggs
Remove from heat and quickly whisk in eggs one at a time to prevent scrambling.
Step 3: Add Baking Agent
Stir in baking soda, which will cause the mixture to become light and frothy.
Step 4: Create Dough
Gradually fold in flour until a soft, sticky dough forms. Work carefully to avoid overmixing.
Step 5: Divide and Rest Dough
Split the dough into 8-10 equal portions. Shape each into a ball and cover with plastic wrap to prevent drying.
Step 6: Roll and Bake Layers
Preheat oven to 350°F. Roll each dough ball into ultra-thin circles. Bake on parchment-lined sheets for 5-7 minutes until edges turn golden brown.
Step 7: Trim Cake Layers
While layers are warm, use a plate as a guide to cut perfect circular shapes. Save trimmed edges for later decoration.
Step 8: Whip Cream Filling
Beat heavy cream until stiff peaks develop. Gently fold in:Step 9: Layer Cake
Place first cake layer on serving plate. Spread cream filling evenly. Repeat with remaining layers.
Step 10: Frost and Decorate
Cover entire cake with remaining cream filling. Crush reserved cake scraps and sprinkle over top and sides.
Step 11: Chill and Set
Refrigerate cake for minimum 6 hours or overnight. This allows flavors to blend and cake to soften.
Extra Pointers for Russian Honey Cake Success
Best Way to Store and Heat Russian Honey Cake
Drinks and Sides That Fit Russian Honey Cake
Russian Honey Cake Twists to Consider
Russian Honey Cake FAQs You Might Wonder About
Russian Honey Cake requires some technique but is manageable with patience. The key is carefully melting the honey mixture, mixing quickly when adding eggs, and rolling thin, even layers.
Resting allows the cream to soften the cake layers, creating a signature tender texture. The flavors also blend and develop, making the cake more delicious and less crumbly.
Yes, this cake actually improves with time. You can prepare it 1-2 days in advance and keep it refrigerated, which helps develop its rich flavor and soft texture.
The layers are made with a honey-butter dough that’s cooked slightly before baking, creating a thin, crisp texture that becomes soft and tender when layered with cream.
Print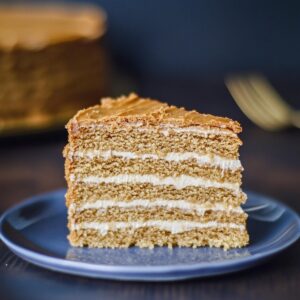
Russian Honey Cake Recipe
- Total Time: 1 hour 10 minutes
- Yield: 8 1x
Description
Delightful Russian Honey Cake weaves sweet memories of Moscow’s charming bakeries into each delicate layer. Rich caramel notes and tender crumb invite you to savor a slice of culinary tradition that whispers Russian comfort.
Ingredients
Primary Ingredients:
- 360 g (3 cups) all-purpose flour
- 180 g (½ cup) honey
- 2 large eggs
- 115 g (½ cup) unsalted butter
- 600 g (2 ½ cups) sour cream (full fat)
- 400 g (1 ¾ cups) heavy whipping cream
Sweeteners and Flavor Enhancers:
- 100 g (½ cup) granulated sugar
- 100 g (½ cup) powdered sugar
- 2 teaspoons vanilla extract
- 1 teaspoon baking soda
Garnish and Optional Toppings:
- Crumbled cake scraps
- Honey drizzle (optional)
- Fresh berries or mint leaves (optional)
Instructions
- Craft a saucepan mixture by gently melting honey, butter, and sugar over medium heat, stirring until the ingredients transform into a silky, uniform consistency.
- Remove the saucepan from heat and vigorously integrate eggs, whisking rapidly to prevent protein coagulation.
- Introduce baking soda into the warm mixture, observing the chemical reaction that creates a light, airy texture.
- Methodically fold flour into the liquid base, kneading until a pliable, slightly tacky dough emerges.
- Segment the dough into 8-10 uniform spheres, cocooning each in transparent film to prevent moisture loss.
- Heat the oven to 350F (175C). Carefully stretch each dough ball into gossamer-thin rounds using a rolling pin, ensuring consistent thickness.
- Transfer delicate layers onto parchment-lined trays, baking until edges acquire a golden-brown hue, approximately 5-7 minutes.
- While layers retain warmth, sculpt precise circles using a plate as a template, preserving trimmed fragments for future embellishment.
- Whip heavy cream until peaks stand proudly, then tenderly incorporate sour cream, powdered sugar, and vanilla, creating a luxurious, velvety filling.
- Construct the cake by alternating delicate layers with generous cream spread, ensuring symmetrical coverage.
- Enrobe the entire confection with remaining cream, creating a smooth exterior.
- Pulverize reserved cake scraps and artfully dust them across the cake’s surface and sides for textural intrigue.
- Refrigerate the assembled masterpiece for a minimum of 6 hours, allowing flavors to harmonize and texture to soften, ideally overnight.
Notes
- Roll layers extra thin for delicate, crisp texture that melts in your mouth, creating signature Medovik (Russian Honey Cake) experience.
- Bake cake layers precisely at recommended temperature to prevent burning or undercooking, ensuring golden-brown perfection with subtle caramelized edges.
- Crush cake scraps finely for elegant, uniform coating that provides delightful crunch and visual appeal when decorating the cake’s exterior.
- Allow significant chilling time to transform cake’s texture, letting honey layers absorb cream and develop rich, harmonious flavor profile.
- Prep Time: 30 minutes
- Cook Time: 40 minutes
- Category: Desserts
- Method: Baking
- Cuisine: Russian
Nutrition
- Serving Size: 8
- Calories: 563
- Sugar: 36 g
- Sodium: 100 mg
- Fat: 39 g
- Saturated Fat: 24 g
- Unsaturated Fat: 15 g
- Trans Fat: 0 g
- Carbohydrates: 42 g
- Fiber: 1 g
- Protein: 6 g
- Cholesterol: 92 mg
Jessica Martinez
Pastry Chef & Recipe Developer
Expertise
Organic Baking Techniques, Gluten-Free Recipe Development, Southwestern Dessert Specialties, Food Styling and Photography
Education
Santa Fe Community College (SFCC)
Jessica brings the sweet side to Urban Organic with her passion for baking and love for the Southwest. She trained at Santa Fe Community College and has built a career creating beautiful, gluten-free, and organic desserts that feel both nostalgic and new.
She believes baking should be fun, creative, and open to everyone, no matter your diet or skill level. Jessica’s recipes are simple enough to follow, but special enough to remember.