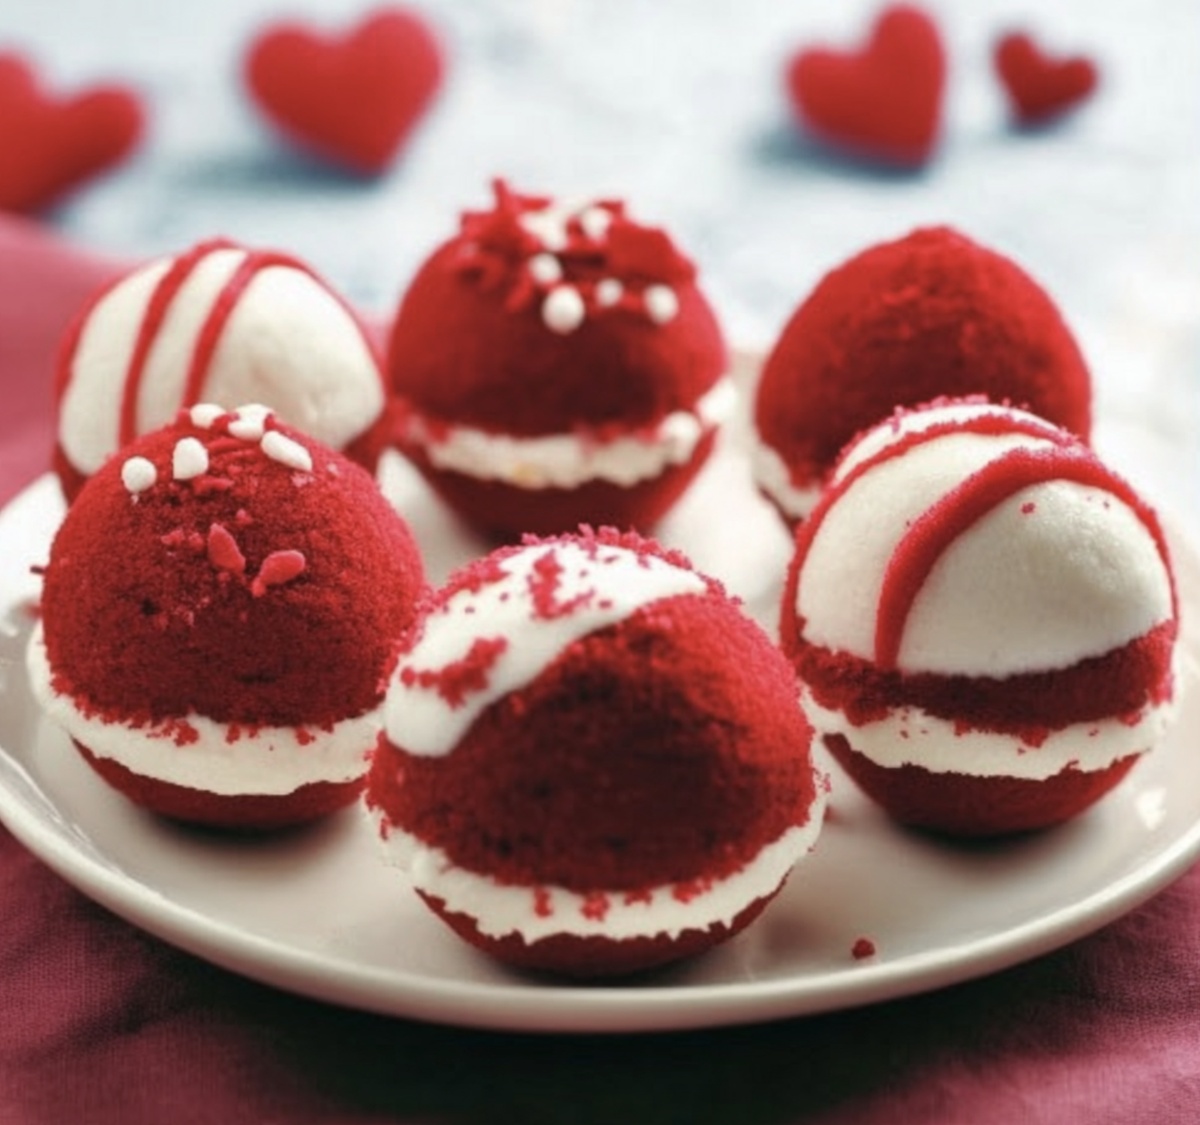
Dreamy Red Velvet Cake Balls Recipe for Valentine’s Day Magic
Sweet moments often sparkle with a valentine’s day red velvet cake balls charm that melts hearts instantly.
Delicate crimson spheres promise pure romantic indulgence with every single bite.
Compact and adorable, these tiny treats blend rich cocoa undertones with smooth cream cheese frosting.
Tiny confections like these speak volumes about affection without uttering a single word.
Small batches create perfect shareable desserts that invite intimate connections.
Handcrafted with love, each cake ball becomes a delectable expression of tender emotions.
Your special someone will absolutely swoon over these delightful crimson delicacies.
Why These Red Velvet Cake Balls Feel Festive
Ingredients for Valentine’s Red Velvet Cake Balls
Cake Base:Frosting and Binding:Coating and Decoration:How to Roll, Chill, and Decorate Them Easily
Step 1: Bake Vibrant Red Velvet Cake
Preheat your oven and grab a box of red velvet cake mix. Follow the package directions carefully, mixing ingredients and pouring batter into a prepared pan. Bake until a toothpick comes out clean, creating a rich, crimson-colored cake.
Step 2: Cool and Crumble Cake
Allow the cake to cool completely at room temperature. Once cooled, use your hands or a fork to break the cake into super fine, delicate crumbs in a spacious mixing bowl. The texture should resemble soft, loose breadcrumbs.
Step 3: Blend Creamy Frosting
Add cream cheese frosting to the crumbled cake. Mix thoroughly until the mixture becomes a smooth, moldable consistency that holds together when pressed.
Step 4: Shape Delightful Balls
Roll the cake and frosting mixture into small, uniform spheres using your palms. Place the formed balls on a parchment-lined baking sheet.
Step 5: Chill Cake Balls
Refrigerate the cake balls for about 30 minutes to help them firm up and maintain their shape.
Step 6: Prepare Chocolate Coating
Melt white or dark chocolate in a microwave-safe bowl, stirring occasionally to ensure smooth consistency.
Step 7: Dip and Decorate
Carefully dip each chilled cake ball into the melted chocolate, using a fork to help coat evenly. Tap off excess chocolate and place back on the parchment paper.
Step 8: Add Festive Touches
Sprinkle with:Step 9: Set and Serve
Let the chocolate coating harden completely at room temperature or in the refrigerator. Arrange on a beautiful serving plate for a romantic Valentine’s Day treat.
Tricks for Cake Balls That Hold Their Shape
Storing and Reusing Red Velvet Cake Balls
What to Pair with This Sweet Treat
Red Velvet Cake Ball Variations
Cake Ball FAQs
You’ll need a red velvet cake mix, cream cheese frosting, white chocolate melting wafers, and optional sprinkles for decoration. The basic ingredients are simple and easily found in most grocery stores.
Make sure the cake crumbs are mixed thoroughly with frosting to create a sticky consistency. Chill the cake ball mixture for about 30 minutes before dipping, which helps them hold their shape and makes coating easier.
Yes! You can prepare the cake balls up to 3 days ahead and store them in the refrigerator. For longer storage, freeze them for up to 2 weeks. Just keep them in an airtight container between layers of parchment paper.
A food processor helps crumble the cake evenly, but you can also use your hands. A small cookie scoop or tablespoon makes portioning the cake balls consistent. A dipping tool or fork works best for coating in melted chocolate.
Print
Valentines Day Red Velvet Cake Balls Recipe
- Total Time: 50 minutes
- Yield: 24 1x
Description
Red velvet cake balls bring romantic charm to Valentine’s celebrations with luscious chocolate coating and velvety crumbs. Sweet indulgence meets festive romance, offering you a delightful bite-sized treat perfect for sharing special moments.
Ingredients
Cake Base:
- 1 box red velvet cake mix
- Ingredients required to bake cake mix (as specified on box)
Filling and Coating Ingredients:
- 1 (8 ounces / 226 grams) package cream cheese (softened)
- ½ cup (60 grams) powdered sugar
- ½ teaspoon vanilla extract
- 12 ounces (340 grams) white chocolate or candy melts (melted)
- 1 tablespoon coconut oil or vegetable shortening (optional, for smoother coating)
Decoration:
- Valentines Day sprinkles (for decoration)
Instructions
- Bake the red velvet cake mix according to the package directions, ensuring an even, moist texture throughout.
- Allow the freshly baked cake to cool completely at room temperature, which prevents moisture condensation and maintains the cake’s structural integrity.
- Gently break down the cooled cake into fine, uniform crumbs using your hands or a fork, creating a consistent texture that will help bind the cake balls.
- In a separate mixing bowl, combine cream cheese frosting with the cake crumbs, kneading the mixture until it forms a smooth, moldable consistency that holds together easily.
- Roll the cake and frosting mixture into uniform, bite-sized spheres, using gentle pressure to compact the balls and prevent crumbling.
- Place the formed cake balls on a parchment-lined baking sheet and refrigerate for approximately 30 minutes to firm up their structure.
- Melt white chocolate coating in a microwave-safe bowl, stirring periodically to ensure a smooth, lump-free consistency.
- Carefully dip each chilled cake ball into the melted white chocolate, using a fork to drain excess coating and create an even, glossy exterior.
- Decorate the chocolate-covered cake balls with romantic red sprinkles or drizzled dark chocolate while the coating is still wet.
- Return the decorated cake balls to the refrigerator to set the chocolate and maintain their shape until ready to serve.
Notes
- Choose high-quality cocoa powder for a rich, deep red color that makes the cake balls more visually appealing.
- Mix cream cheese frosting gradually to achieve the perfect consistency for rolling smooth cake balls without cracking.
- Chill the mixture before forming balls to help them hold shape and make dipping in chocolate coating easier.
- Consider using white chocolate instead of dark for a classic Valentine’s Day romantic presentation that adds extra sweetness.
- Prep Time: 20 minutes
- Cook Time: 30 minutes
- Category: Desserts, Snacks
- Method: Baking
- Cuisine: American
Nutrition
- Serving Size: 24
- Calories: 150
- Sugar: 10 g
- Sodium: 200 mg
- Fat: 7 g
- Saturated Fat: 4 g
- Unsaturated Fat: 2 g
- Trans Fat: 0 g
- Carbohydrates: 20 g
- Fiber: 0 g
- Protein: 2 g
- Cholesterol: 15 mg
Jessica Martinez
Pastry Chef & Recipe Developer
Expertise
Organic Baking Techniques, Gluten-Free Recipe Development, Southwestern Dessert Specialties, Food Styling and Photography
Education
Santa Fe Community College (SFCC)
Jessica brings the sweet side to Urban Organic with her passion for baking and love for the Southwest. She trained at Santa Fe Community College and has built a career creating beautiful, gluten-free, and organic desserts that feel both nostalgic and new.
She believes baking should be fun, creative, and open to everyone, no matter your diet or skill level. Jessica’s recipes are simple enough to follow, but special enough to remember.