
Dreamy Rocky Road Candy Recipe for Sweet Tooth Joy
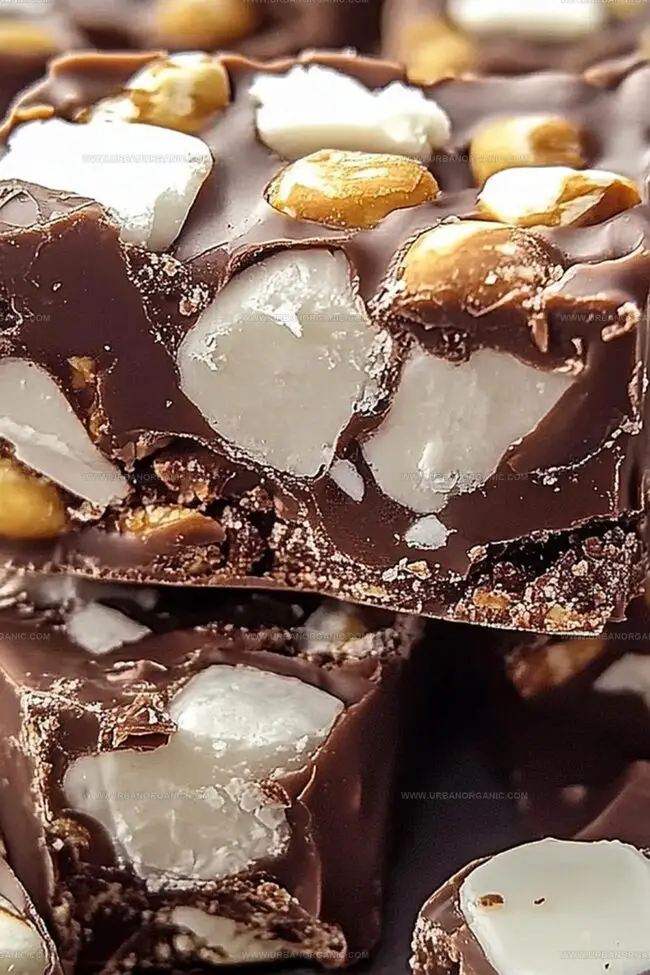
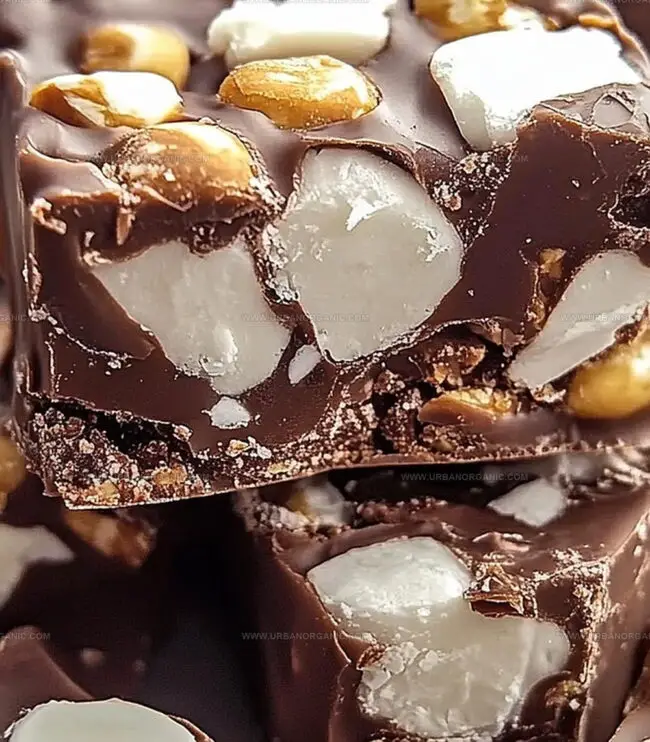
Rocky road candy tempts taste buds with its irresistible blend of chocolate, marshmallows, and nuts.
Sweet clusters promise a delightful escape from ordinary desserts.
Childhood memories flood back with each decadent bite.
Crunchy textures mingle with gooey marshmallow goodness in this classic treat.
Simple ingredients create magic in your kitchen.
Rich chocolate binds everything into perfect, indulgent morsels.
You’ll want to make this recipe again and again – trust me.
Why Rocky Road Candy Is a Chocolate Lover’s Dream
Ingredients for the Perfect Rocky Road Candy
Base Ingredients:Texture and Crunch Ingredients:Flavor Enhancers:How to Make Chunky, Chocolatey Rocky Road
Step 1: Melt Chocolate Goodness
Grab a microwave-safe bowl and combine:Zap in 30-second bursts, stirring between each interval until chocolate transforms into a silky smooth river. For traditionalists, a double boiler works wonderfully too.
Step 2: Boost Flavor Explosion
Stir in:Gently fold in:Ensure every morsel gets a luxurious chocolate coating.
Step 3: Create Candy Canvas
Line an 8×8-inch baking dish with parchment paper. Pour the chocolatey mixture and spread evenly, creating a delectable landscape of sweet textures.
Step 4: Chill and Set
Slide the pan into the refrigerator. Let the candy rest and solidify for 1-2 hours until firm and irresistible.
Step 5: Slice and Celebrate
Retrieve the chilled creation. Slice into perfect squares or break into rustic chunks. Share with friends or savor every bite solo!
Tips That Keep Rocky Road from Getting Too Soft
Store and Share Rocky Road Candy Like a Pro
Sweets and Snacks That Pair with Rocky Road
Rocky Road Variations That Add Even More Fun
Candy FAQs – Rocky Road Style
Yes, you can substitute semi-sweet, dark, or milk chocolate chips based on your preference. Each type will give a slightly different flavor profile to the candy.
Replace almonds with roasted peanuts, pecans, or sunflower seeds. If you have a nut allergy, you can omit nuts entirely and add extra marshmallows or crushed graham crackers for crunch.
When stored in an airtight container in the refrigerator, the candy will keep for up to 2 weeks. For best texture, let it sit at room temperature for 5-10 minutes before serving.
Absolutely! Consider adding dried fruit like cherries or cranberries, crushed cookies, or mini chocolate chips to customize your candy and create unique flavor combinations.
Print
Rocky Road Candy Recipe
- Total Time: 1 hour 10 minutes
- Yield: 12 1x
Description
Sweet chocolate meets marshmallow magic in this Rocky Road Candy, where indulgent chunks of nuts and pillowy marshmallows dance through rich cocoa landscapes. Pure chocolate bliss awaits when you break into these irresistible clusters of pure confectionery joy.
Ingredients
Main Ingredients:
- 2 cups (340 grams) semi-sweet chocolate chips
- 2 cups (80 grams) mini marshmallows
- 1 cup (120 grams) roasted almonds
Binding/Flavoring Ingredients:
- 1 tablespoon (14 grams) butter
- ½ teaspoon vanilla extract
Seasoning:
- ¼ teaspoon salt
Instructions
- Prepare a microwave-safe container and create a silky chocolate base by gently melting chocolate chips with butter, stirring carefully between 30-second heating intervals to prevent scorching. Ensure a completely smooth, glossy texture emerges.
- Enhance the melted chocolate mixture with a splash of fragrant vanilla extract and a delicate pinch of salt, which will intensify the overall flavor profile.
- Gently incorporate fluffy marshmallows and crunchy almonds into the chocolate mixture, carefully folding to guarantee each ingredient receives an even chocolate coating.
- Select an 8-inch baking pan and line it completely with parchment paper, allowing slight overhang for easy removal. Transfer the chocolate-coated mixture into the prepared pan.
- Spread the mixture uniformly across the pan’s surface, creating a smooth, consistent layer that will ensure balanced texture in every bite.
- Transfer the pan to the refrigerator and allow the rocky road candy to set and solidify completely, which typically requires approximately 1-2 hours of chilling time.
- Once the mixture has firmly set, lift the candy from the pan using the parchment paper edges. Slice into precise square portions or break into rustic, irregular chunks for a more casual presentation.
- Serve the rocky road candy chilled and enjoy the delightful combination of rich chocolate, soft marshmallows, and crunchy almonds.
Notes
- Choose dark or milk chocolate based on personal preference, both work wonderfully for creating rich flavor profiles.
- Melt chocolate gently to prevent burning, using low heat and stirring frequently ensures smooth, glossy texture.
- Toast almonds beforehand to enhance their nutty flavor and add extra depth to the candy’s taste.
- Use gluten-free marshmallows and chocolate for a celiac-friendly version that doesn’t compromise on deliciousness.
- Prep Time: 10 minutes
- Cook Time: 1 hour
- Category: Desserts, Snacks
- Method: Blending
- Cuisine: American
Nutrition
- Serving Size: 12
- Calories: 290
- Sugar: 18 g
- Sodium: 220 mg
- Fat: 18 g
- Saturated Fat: 10 g
- Unsaturated Fat: 8 g
- Trans Fat: 0 g
- Carbohydrates: 29 g
- Fiber: 1 g
- Protein: 4 g
- Cholesterol: 70 mg
Jessica Martinez
Pastry Chef & Recipe Developer
Expertise
Organic Baking Techniques, Gluten-Free Recipe Development, Southwestern Dessert Specialties, Food Styling and Photography
Education
Santa Fe Community College (SFCC)
Jessica brings the sweet side to Urban Organic with her passion for baking and love for the Southwest. She trained at Santa Fe Community College and has built a career creating beautiful, gluten-free, and organic desserts that feel both nostalgic and new.
She believes baking should be fun, creative, and open to everyone, no matter your diet or skill level. Jessica’s recipes are simple enough to follow, but special enough to remember.