
No-Bake Philadelphia Cheesecake Recipe for Ultra Creaminess
Creamy philadelphia no-bake cheesecake promises pure indulgence without turning on your oven.
Summer heat meets dessert perfection in this silky smooth treat.
Cool kitchen vibes welcome this simple yet luxurious recipe.
Minimal effort delivers maximum satisfaction for sweet tooth enthusiasts.
Chilled ingredients blend into a dreamy landscape of classic comfort.
Graham cracker crusts provide delightful crunch against velvety cream cheese filling.
Whip up this elegant dessert that impresses without complex techniques.
I guarantee you’ll fall in love with every decadent spoonful.
What’s Great About Philadelphia No-Bake Cheesecake

Ingredients Checklist for Philadelphia No-Bake Cheesecake
Crust Ingredients:Filling Ingredients:Topping Ingredients:How to Put Together Philadelphia No-Bake Cheesecake
Step 1: Craft the Crunchy Base
Grab your mixing bowl and toss in:Smash everything together until it feels like wet sand. Press this mixture firmly into the bottom of a springform pan, creating a solid foundation. Pop it in the refrigerator to chill while you work on the creamy magic.
Step 2: Whip Up the Silky Filling
Grab your electric mixer and blend until ultra-smooth:Ensure the mixture looks glossy and has zero lumps. The key is patience and consistent mixing.
Step 3: Fold in the Clouds
Gently incorporate whipped topping into the cream cheese mixture. Use a spatula and fold with light, sweeping motions to keep the filling airy and light.
Step 4: Shape and Settle
Transfer the fluffy filling into your prepared crust. Use a spatula to create an even, beautiful surface. No peaks or valleys allowed!
Step 5: Chill and Wait
Slide the cheesecake into the refrigerator. Let it rest and set for minimum 3 hours. Patience transforms this dessert from good to spectacular.
Step 6: Dress and Serve
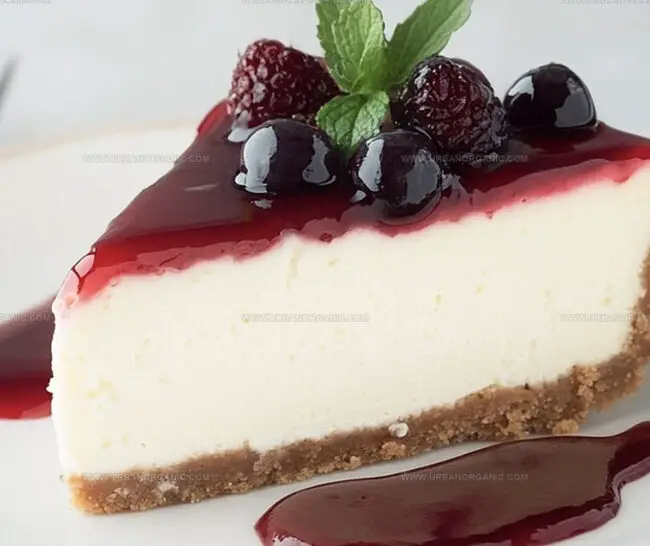
Before serving, crown your cheesecake with fresh berries, fruit compote, or chocolate drizzle. Each topping tells a different delicious story.
Smart Ideas for Your Philadelphia No-Bake Cheesecake
Storing and Reusing Philadelphia No-Bake Cheesecake
Best Flavor Matches for This No-Bake Cheesecake
Cool Variations of Philadelphia No-Bake Cheesecake
Answers to Your Philadelphia Cheesecake Curiosities
Yes, you can substitute graham crackers with digestive biscuits or vanilla wafers for a similar texture and flavor profile.
Microwave the cream cheese in 10-second intervals, stirring between each interval, until it reaches a soft, spreadable consistency without melting.
Use a spatula and fold gently, avoiding vigorous stirring. Tap the filled pan lightly on the counter to help release any trapped air bubbles.
Absolutely! You can prepare this cheesecake up to 2 days in advance and keep it covered in the refrigerator until you’re ready to serve.
Print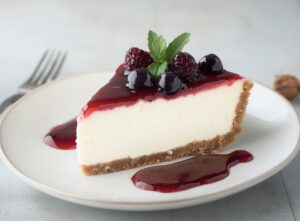
Philadelphia No-Bake Cheesecake Recipe
- Total Time: 3 hours 15 minutes
- Yield: 8 1x
Description
Creamy philadelphia no-bake cheesecake offers pure bliss with minimal effort. Cool, silky layers melt luxuriously on your palate, delivering classic comfort without turning on the oven.
Ingredients
Main Ingredients:
- 2 packages (8 ounces / 226 grams each) Philadelphia cream cheese, softened
- 1 tub (8 ounces / 226 grams) whipped topping, thawed
Crust Ingredients:
- 1 ½ cups graham cracker crumbs
- ⅓ cup granulated sugar
- 6 tablespoons butter, melted
Topping Ingredients:
- ½ cup granulated sugar
- 1 teaspoon vanilla extract
- Cherry pie filling
- Fresh berries
- Chocolate or caramel drizzle
Instructions
- Crush graham crackers into fine particles, blending thoroughly with granulated sweetener and liquefied butter to create a compact foundation.
- Press the crumbly mixture decisively into the base of a circular baking vessel, ensuring an even, compressed layer.
- Momentarily refrigerate the crust while preparing the silky filling.
- Whip cream cheese until exceptionally smooth, incorporating sugar and aromatic vanilla extract with precision.
- Gently integrate whipped cream topping into the cream cheese mixture, maintaining a light, airy texture.
- Transfer the luxurious filling onto the chilled crust, using a spatula to create a perfectly leveled surface.
- Allow the dessert to rest and set within the refrigerator’s cool embrace for a minimum of three hours.
- Prior to presentation, embellish with vibrant fresh fruits or a complementary sauce of your choosing.
- Slice and serve the delicate, creamy confection, revealing its elegant layers and smooth consistency.
Notes
- Customize the crust by swapping graham crackers with gluten-free alternatives like almond flour or crushed gluten-free cookies for those with dietary restrictions.
- Enhance the texture by freezing the crust for 10-15 minutes before adding the filling, ensuring a crispier base that holds together perfectly.
- Create flavor variations by adding lemon zest, melted chocolate, or different extracts like almond or coconut to the cream cheese mixture for a personalized twist.
- Make the dessert lighter by using reduced-fat cream cheese and low-fat whipped topping without compromising the creamy, rich texture of the classic cheesecake.
- Prep Time: 15 minutes
- Cook Time: 3 hours
- Category: Desserts
- Method: None
- Cuisine: American
Nutrition
- Serving Size: 8
- Calories: 410
- Sugar: 1g
- Sodium: 800mg
- Fat: 32g
- Saturated Fat: 14g
- Unsaturated Fat: 16g
- Trans Fat: 0g
- Carbohydrates: 2g
- Fiber: 0g
- Protein: 28g
- Cholesterol: 100mg
Jessica Martinez
Pastry Chef & Recipe Developer
Expertise
Organic Baking Techniques, Gluten-Free Recipe Development, Southwestern Dessert Specialties, Food Styling and Photography
Education
Santa Fe Community College (SFCC)
Jessica brings the sweet side to Urban Organic with her passion for baking and love for the Southwest. She trained at Santa Fe Community College and has built a career creating beautiful, gluten-free, and organic desserts that feel both nostalgic and new.
She believes baking should be fun, creative, and open to everyone, no matter your diet or skill level. Jessica’s recipes are simple enough to follow, but special enough to remember.