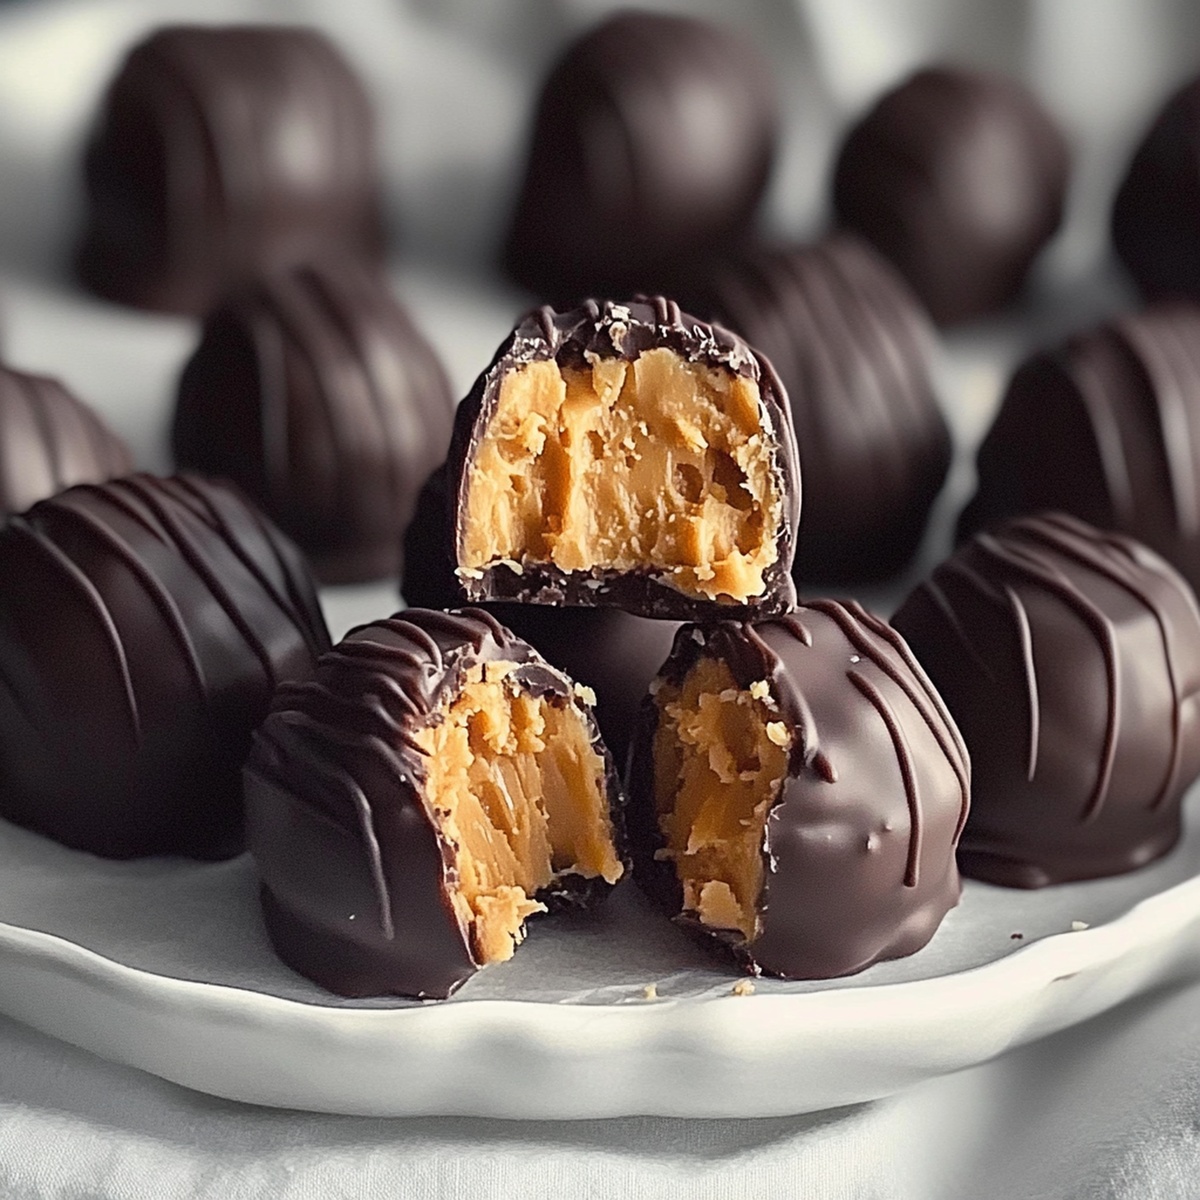
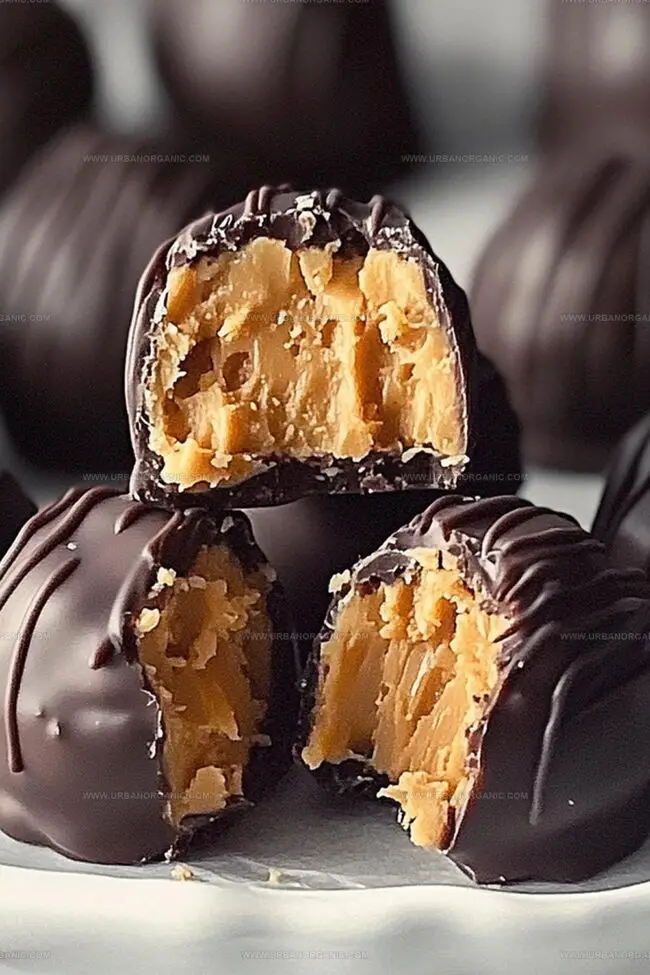
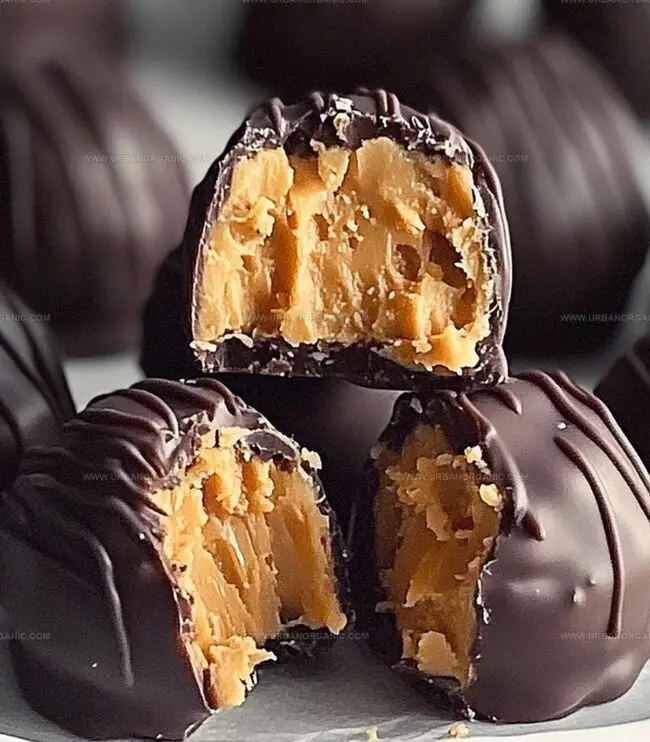
Peanut Butter Truffles Recipe for Sweet Indulgence
Sweet chocolate meets creamy peanut butter truffles in a dessert that’ll make your taste buds dance with pure joy.
Decadent morsels promise an indulgent escape from ordinary treats.
Chocolate lovers will adore these rich, bite-sized delights that melt seamlessly in your mouth.
Small yet powerful, these truffles pack intense flavor into every single morsel.
Anyone can craft these elegant confections with just a few simple ingredients.
Minimal kitchen skills and maximum deliciousness combine to create a perfect homemade dessert.
Let’s whip up something spectacular that will impress everyone at your next gathering.
Peanut Butter Truffles Are Always a Hit
What You’ll Need for Peanut Butter Truffles
Creamy Base:Sweetener:Coating and Garnish:Step-by-Step Guide to Peanut Butter Truffles
Step 1: Create Creamy Filling
Blend ingredients in a mixing bowl until silky smooth with an electric mixer. Mix thoroughly to eliminate any lumps.
Step 2: Transform Into Dough
Gradually fold powdered sugar into mixture. Stir consistently until a thick, moldable dough develops. The consistency should be firm enough to shape easily.
Step 3: Form Perfect Spheres
Roll mixture into small round balls using your palms. Press gently to compact the dough. Place each truffle on a parchment-lined baking sheet. Transfer tray to freezer for quick chilling, approximately 30 minutes.
Step 4: Prepare Chocolate Coating
Melt chocolate and coconut oil in microwave. Heat in short 30-second bursts, stirring between intervals to prevent burning. Continue until mixture becomes completely smooth and glossy.
Step 5: Chocolate Dipping Technique
Remove truffles from freezer. Use a fork or dipping tool to submerge each ball completely in melted chocolate. Gently tap to remove excess coating. Return coated truffles to parchment sheet.
Step 6: Add Finishing Touches
Sprinkle with crushed peanuts or sea salt for extra crunch. Optional: Drizzle white chocolate for decorative effect. Refrigerate truffles until chocolate hardens, approximately 30 minutes.
Step 7: Serve and Preserve
Enjoy truffles chilled or at room temperature. Store in sealed container within refrigerator for two weeks. For longer preservation, freeze up to three months.
Tips for Creamier Peanut Butter Truffles
Keep and Warm Up Peanut Butter Truffles Properly
Snacks and Sips That Match Peanut Butter Truffles
Ways to Remix Peanut Butter Truffle Flavor
FAQs for Making Peanut Butter Truffles
You’ll need peanut butter, butter, vanilla extract, powdered sugar, chocolate chips, coconut oil, and optional toppings like crushed peanuts or sea salt.
Yes, but make sure to use a creamy variety that isn’t too runny. Stabilized natural peanut butter works best to maintain the right texture for truffles.
Ensure the truffles are completely frozen before dipping. Work quickly and use room temperature chocolate to maintain the truffle’s shape.
Yes, simply use gluten-free powdered sugar and check that your chocolate is certified gluten-free. Most ingredients are naturally gluten-free.
Print
Peanut Butter Truffles Recipe
- Total Time: 1 hour 15 minutes
- Yield: 24 1x
Description
Silky smooth peanut butter truffles dance with rich chocolate, creating irresistible bites of pure indulgence. Creamy centers rolled in dark chocolate promise a delightful escape you’ll savor with each heavenly morsel.
Ingredients
Main Ingredients:
- 1 cup creamy peanut butter
- 4 tablespoons (56 grams) unsalted butter, softened
- 1 ½ cups powdered sugar
- 8 ounces (226 grams) semi-sweet or dark chocolate, chopped
Flavoring and Enhancers:
- ½ teaspoon vanilla extract
- 1 teaspoon coconut oil or vegetable shortening (for a smoother coating)
Garnish Ingredients:
- ¼ cup crushed peanuts
- Drizzle of melted white chocolate
- Sea salt flakes
Instructions
- Cream together peanut butter, softened butter, and vanilla extract in a mixing bowl until the mixture becomes uniform and silky.
- Gradually incorporate powdered sugar into the creamy base, stirring continuously until a thick, malleable dough develops that holds its shape.
- Using clean hands, gently roll the dough into uniform spherical portions, approximately one inch in diameter, positioning each truffle on a parchment-lined tray.
- Transfer the tray to the freezer and allow the truffles to solidify for approximately half an hour, ensuring they maintain their compact structure.
- Prepare the chocolate coating by combining chocolate and coconut oil in a microwave-safe vessel, heating in brief intervals and stirring between each session until a smooth, glossy liquid forms.
- Remove the chilled truffles and carefully submerge each one into the melted chocolate, using a fork or toothpick to ensure complete coverage while allowing excess coating to drip away.
- Return the chocolate-enrobed truffles to the parchment-lined tray, then embellish with optional garnishes such as finely chopped peanuts, a delicate sprinkle of sea salt, or a refined white chocolate drizzle.
- Refrigerate the decorated truffles for an additional 30 minutes to facilitate chocolate solidification and enhance flavor melding.
- Serve the truffles either chilled or at ambient temperature, presenting them as an elegant confectionery treat.
- Store the completed truffles within an hermetic container in the refrigerator for up to two weeks, or preserve in the freezer for a maximum of three months for extended enjoyment.
Notes
- Softening butter at room temperature ensures smooth, lump-free mixing for a creamy truffle base.
- Sift powdered sugar gradually to prevent clumping and create a silky, consistent texture in the filling.
- Chilling truffles before dipping helps maintain their shape and prevents chocolate coating from melting.
- For gluten-free option, verify all ingredients are certified gluten-free, especially powdered sugar and chocolate.
- Keep chocolate at a consistent warm temperature during dipping to achieve a glossy, even coating.
- Experiment with different nut butters like almond or cashew for unique flavor variations.
- Use high-quality dark or milk chocolate for richer taste and smoother melting.
- Add a pinch of sea salt to enhance the sweet-savory balance of the truffles.
- Prep Time: 15 minutes
- Cook Time: 1 hour
- Category: Desserts, Snacks
- Method: Blending
- Cuisine: American
Nutrition
- Serving Size: 24
- Calories: 550
- Sugar: 3 g
- Sodium: 1200 mg
- Fat: 36 g
- Saturated Fat: 16 g
- Unsaturated Fat: 20 g
- Trans Fat: 0 g
- Carbohydrates: 40 g
- Fiber: 2 g
- Protein: 22 g
- Cholesterol: 70 mg
Jessica Martinez
Pastry Chef & Recipe Developer
Expertise
Organic Baking Techniques, Gluten-Free Recipe Development, Southwestern Dessert Specialties, Food Styling and Photography
Education
Santa Fe Community College (SFCC)
Jessica brings the sweet side to Urban Organic with her passion for baking and love for the Southwest. She trained at Santa Fe Community College and has built a career creating beautiful, gluten-free, and organic desserts that feel both nostalgic and new.
She believes baking should be fun, creative, and open to everyone, no matter your diet or skill level. Jessica’s recipes are simple enough to follow, but special enough to remember.