
Fluffy Cloud-Like Japanese Cheesecake Recipe for Beginners
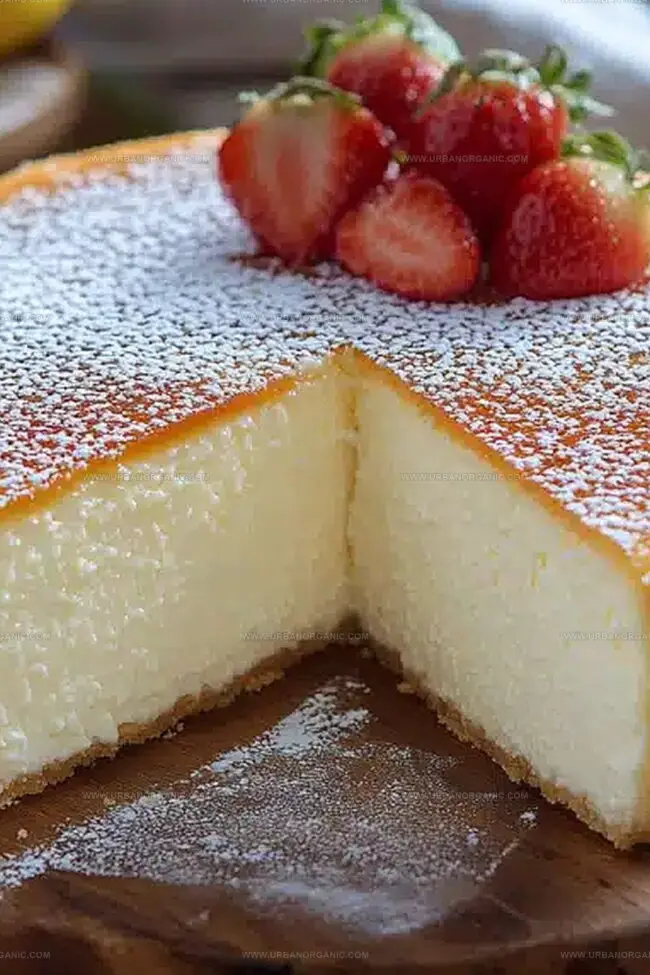
Light and airy, this japanese cheesecake melts like a cloud on your tongue.
Whispers of delicate sweetness dance through each delectable bite.
Culinary magic happens when simple ingredients merge into something extraordinary.
Soft peaks of meringue create a pillowy texture that defies expectations.
Delicate yet rich, the dessert promises a sensory adventure beyond traditional cake experiences.
Smooth cream cheese blends perfectly with gentle egg whites, creating a heavenly confection.
Prepare to experience a dessert that will transport you straight to tokyo’s finest bakeries.
Why Japanese Cheesecake Is Light and Fluffy
What You Need for Japanese Cheesecake
Main Ingredients
Dairy Base:Egg Components:Dry Ingredients:Flavor Enhancers:Stabilizing Ingredient:Additional Components:How to Prepare a Japanese Cheesecake That Works

Step 1: Prep Baking Setup
Preheat oven to 320F (160C).
Grab a 9-inch round cake pan.
Line bottom with parchment paper.
Wrap exterior with aluminum foil.
Step 2: Create Creamy Base
Gather ingredients:Place cream cheese, butter, and milk in heatproof bowl over simmering water.
Whisk until mixture becomes silky smooth.
Remove from heat.
Add sugar and blend thoroughly.
Incorporate egg yolks one by one.
Sift flour and cornstarch into mixture.
Whisk until batter looks glossy.
Stir in remaining flavor enhancers.
Step 3: Whip Fluffy Topping
Gather ingredients:Beat egg whites until foamy.
Add cream of tartar.
Continue beating until soft peaks emerge.
Slowly sprinkle sugar while mixing.
Beat until peaks stand tall and glossy.
Step 4: Combine and Bake
Gently fold meringue into cream base.
Pour batter into prepared pan.
Tap pan to release air bubbles.
Place pan inside larger baking dish.
Fill larger dish with hot water halfway up cake pan.
Bake at 320F for 25 minutes.
Reduce temperature to 280F.
Bake additional 55 minutes until golden.
Step 5: Cool and Finish
Turn off oven.
Leave cake inside with door slightly open for 15 minutes.
Remove from oven and water bath.
Cool completely in pan.
Transfer to serving plate.
Optional: Dust with powdered sugar.
Tips for Perfect Texture in Japanese Cheesecake
How to Store Japanese Cheesecake Correctly
Great Pairings for Japanese Cheesecake
New Flavors to Try in Japanese Cheesecake
Japanese Cheesecake – Answers to Common Questions
The water bath helps create a gentle, even heat around the cake, preventing cracking and ensuring a smooth, creamy texture by maintaining a consistent temperature during baking.
Japanese cheesecake is lighter, fluffier, and less dense compared to traditional New York-style cheesecake. It uses a meringue technique that gives it a souffle-like texture and a soft, jiggly consistency.
For best results, stick to the original recipe. However, you can use lactose-free milk and cream cheese if you have dietary restrictions. Avoid major substitutions that might affect the cake’s delicate structure.
Careful folding preserves the air bubbles in the meringue, which gives the Japanese cheesecake its signature light and airy texture. Overmixing can deflate the batter and result in a dense, flat cake.
Print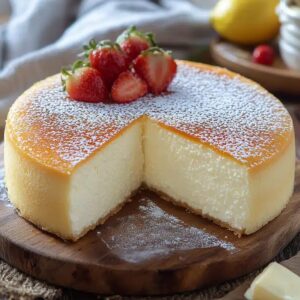
Japanese Cheesecake Recipe
- Total Time: 40 minutes
- Yield: 8 1x
Description
Silky Japanese Cheesecake whispers elegance through its cloud-like texture and delicate flavor profile. Light as air and perfectly balanced, this heavenly dessert will transport you straight to Tokyo’s most charming patisserie.
Ingredients
Main Ingredients:
- 6 large egg whites
- 6 large egg yolks
- 10 ounces (285 grams) cream cheese, softened
- ½ cup whole milk
Flour and Thickeners:
- ⅔ cup cake flour
- 2 tablespoons cornstarch
Flavor and Sweetening Ingredients:
- ½ cup granulated sugar
- 2 tablespoons unsalted butter
- ¼ teaspoon cream of tartar
- 1 tablespoon lemon juice
- 1 teaspoon lemon zest
- ½ teaspoon vanilla extract
Instructions
- Meticulously prepare a 9-inch round cake pan by thoroughly greasing its interior and lining the bottom with parchment paper. Encase the exterior with aluminum foil to create a water-resistant barrier.
- Establish a double boiler setup by placing a heatproof bowl over simmering water. Merge cream cheese, butter, and milk, whisking until achieving a velvety smooth consistency. Allow the mixture to cool slightly.
- Incorporate granulated sugar into the cream cheese blend, ensuring complete integration. Introduce egg yolks individually, mixing thoroughly after each addition to maintain a uniform texture.
- Delicately sift cake flour and cornstarch into the mixture, whisking until achieving a silky-smooth batter. Enhance flavor profiles by stirring in lemon juice, zest, and vanilla extract.
- In a pristine, moisture-free bowl, transform egg whites using an electric mixer. Initially create a frothy texture, then introduce cream of tartar. Continue beating until soft peaks emerge.
- Gradually sprinkle granulated sugar while continuing to beat the egg whites. Persist until stiff, glossy peaks form, indicating perfect meringue consistency.
- Gently fold the meringue into the cream cheese mixture, executing this process in three careful stages to preserve the airy structure. Transfer the batter to the prepared pan, softly tapping to eliminate potential air pockets.
- Position the cake pan within a larger baking dish, surrounding it with hot water that reaches midway up the pan’s exterior. Slide into a preheated oven set at 320F (160C).
- Bake for 25 minutes, then reduce temperature to 280F (140C). Continue baking for an additional 55 minutes until the surface achieves a golden-brown hue and the cake sets completely.
- Once baking completes, turn off the oven and leave the door slightly ajar, allowing the cake to rest for 15 minutes. This gradual cooling prevents potential structural collapse.
- Carefully extract the cake from the water bath, permitting it to cool entirely within the pan. After complete cooling, delicately remove from the pan, peel away parchment paper, and transfer to a serving plate.
- Optionally dust the top with a light veil of powdered sugar, creating an elegant finishing touch before presenting this delicate Japanese cheesecake.
Notes
- Ensure cream cheese and butter are at room temperature for smooth, lump-free mixing.
- Wrap pan tightly with foil to prevent water seepage during water bath baking.
- Use fresh eggs at room temperature for better meringue volume and stability.
- Fold meringue gently to maintain its airy texture and prevent batter deflation.
- Avoid opening the oven door during baking to maintain consistent temperature.
- Create gluten-free version by substituting cake flour with gluten-free flour blend.
- Reduce sugar for a less sweet option or use alternative sweeteners like stevia.
- Add matcha powder for a green tea flavor variation.
- Garnish with fresh berries or whipped cream for extra elegance.
- Cool cake gradually to prevent cracking and maintain soft, souffle-like texture.
- Store in refrigerator for up to 3 days, covering to prevent drying out.
- Serve slightly chilled or at room temperature for best taste and texture.
- Prep Time: 20 minutes
- Cook Time: 20 minutes
- Category: Desserts, Snacks
- Method: Baking
- Cuisine: Japanese
Nutrition
- Serving Size: 8
- Calories: 205
- Sugar: 12 g
- Sodium: 83 mg
- Fat: 9 g
- Saturated Fat: 5 g
- Unsaturated Fat: 3 g
- Trans Fat: 0 g
- Carbohydrates: 25 g
- Fiber: 0 g
- Protein: 4 g
- Cholesterol: 123 mg
Jessica Martinez
Pastry Chef & Recipe Developer
Expertise
Organic Baking Techniques, Gluten-Free Recipe Development, Southwestern Dessert Specialties, Food Styling and Photography
Education
Santa Fe Community College (SFCC)
Jessica brings the sweet side to Urban Organic with her passion for baking and love for the Southwest. She trained at Santa Fe Community College and has built a career creating beautiful, gluten-free, and organic desserts that feel both nostalgic and new.
She believes baking should be fun, creative, and open to everyone, no matter your diet or skill level. Jessica’s recipes are simple enough to follow, but special enough to remember.