
Pioneer Woman’s Golden Sunrise Cinnamon Bread Recipe
Pioneer Woman’s cinnamon bread transforms ordinary mornings into extraordinary culinary adventures with its soul-warming essence.
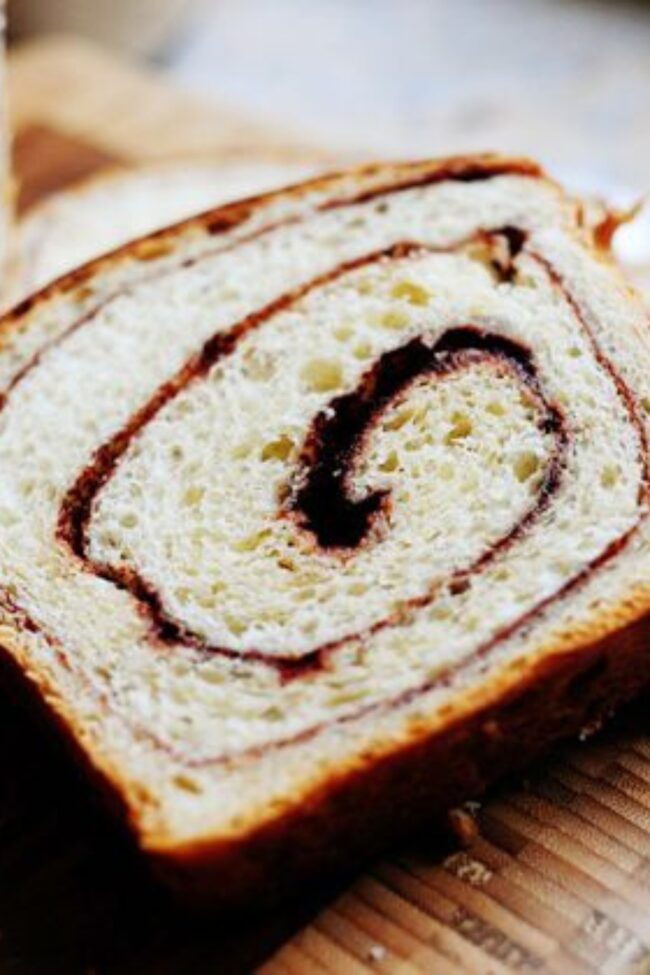
Swirling ribbons of sweet cinnamon promise an irresistible journey through homestyle comfort.
Fragrant steam rises from golden loaves, whispering tales of nostalgic kitchen memories.
Every slice tells a story of tender crumb and delicate spice dancing together in perfect harmony.
Simple ingredients become extraordinary when mixed with passion and a dash of love.
Bakers of all skill levels can create this magical bread that speaks directly to the heart.
Grab your mixing bowl and let the aroma of comfort guide you to baking magic.
Quick Recipe Overview

What’s Inside Pioneer Woman Cinnamon Bread
For Yeast Activation:For Dough Foundation:For Filling and Finishing:Bakeware to Use for Cinnamon Bread
Making Cinnamon Bread from Scratch

Gently warm milk and butter in a saucepan until just melted. Cool mixture to lukewarm. Sprinkle yeast over the liquid and let it dance and bubble for 10 minutes until gloriously frothy.
Combine yeast mixture with sugar and eggs in a mixer. Gradually fold in flour and salt, blending until a smooth, silky dough emerges. Knead with passion for 10 minutes, adding tiny amounts of flour if the dough feels clingy.
Transfer dough to an oiled bowl, twirling to coat. Drape with a soft cloth and let it rest in a cozy corner for 2 hours, watching it bloom and expand like a rising sun.
Roll out dough into a generous rectangle. Lavish with soft butter, then shower with a blizzard of cinnamon and sugar. Roll tightly, tucking the edges like a warm embrace. Nestle into a buttered pan and let it rise for another hour.
Heat the oven to a warm 350°F. Brush the loaf with a golden egg wash, then slide into the oven. Bake for 40 minutes, listening for the hollow tap that signals perfection. Shield with foil if the top starts to tan too quickly.
Sweet Spice Tips for Cinnamon Bread
Serving Suggestions for Cinnamon Loaf
How to Store Cinnamon Bread for Freshness
Irresistible Pioneer Woman Cinnamon Bread Recipe
- Total Time: 4 hours 40 minutes
- Yield: 11 1x
Description
Hearty pioneer woman cinnamon bread delivers sweet, warm comfort with minimal effort. Home bakers can master this simple recipe and enjoy delightful slices alongside coffee or tea.
Ingredients
- 3 ½ cups (437.5 g) all-purpose flour
- 1 cup (240 ml) milk (whole)
- 2 large eggs
- 6 tbsps (85 g) unsalted butter
- 2 tbsps (28 g) softened butter
- ⅓ cup (66 g) granulated sugar (for dough)
- ⅓ cup (66 g) granulated sugar (for filling)
- 2 ½ tsps active dry yeast
- 1 tsp salt
- 2 tbsps cinnamon
- 1 large egg + 1 tbsp milk (for brushing)
Instructions
- Yeast Activation: Gently warm butter and milk to lukewarm. Sprinkle yeast over the liquid and let bloom until foamy and fragrant.
- Dough Preparation: Blend sugar and eggs in a stand mixer. Incorporate activated yeast mixture, then gradually add flour and salt, mixing until a cohesive dough forms.
- Kneading Process: Use dough hook to knead for 10-12 minutes, creating an elastic texture that pulls away from the bowl’s sides. Adjust flour if needed.
- First Rise: Transfer dough to an oiled bowl, cover with plastic wrap, and let rise in a warm spot until volume doubles, about 2 hours.
- Filling and Shaping: Roll dough into a thin rectangle on a floured surface. Spread softened butter evenly, then dust with cinnamon-sugar mixture. Roll tightly from the longer edge to create a compact log.
- Second Rise: Place rolled dough seam-side down in a greased loaf pan. Cover and allow to rise for an additional 1 hour and 45 minutes.
- Baking Preparation: Preheat oven to 350°F. Brush loaf with egg wash, creating a glossy finish.
- Final Baking: Bake for 40-45 minutes, rotating midway for even browning. Bread is done when golden-brown and produces a hollow sound when tapped. Shield with foil if top browns too quickly.
Notes
- Yeast Activation Tip: Ensure milk and butter are exactly lukewarm (115°F) for perfect yeast bloom, which guarantees soft, fluffy bread texture.
- Dough Consistency Check: Watch for elastic dough that smoothly pulls away from mixer bowl; add flour sparingly if too sticky to prevent dense bread.
- Rising Environment Matters: Choose a draft-free, warm spot like near a pilot light or inside a turned-off oven to help dough rise properly and develop rich flavor.
- Golden Crust Protection: Monitor bread during baking and use aluminum foil tent if top browns too quickly, ensuring even cooking without burning.
- Prep Time: 4 hours
- Cook Time: 40 minutes
- Category: Breakfast, Snacks, Desserts
- Method: Baking
- Cuisine: American
Nutrition
- Serving Size: 11
- Calories: 325
- Sugar: 18 g
- Sodium: 300 mg
- Fat: 15 g
- Saturated Fat: 9 g
- Unsaturated Fat: 4 g
- Trans Fat: 0 g
- Carbohydrates: 40 g
- Fiber: 1 g
- Protein: 7 g
- Cholesterol: 85 mg
Michael Thompson
Founder & Culinary Director
Expertise
Classical & Contemporary Cooking Techniques, Global Cuisine Appreciation, Nutrition & Menu Engineering, Sustainable Cooking Practices, Farm-to-Table Cuisine
Education
Southwestern Oregon Community College
Michael grew up in Oregon, where he learned early that food tastes better when it’s fresh, local, and made with care.
After earning his degree from the Southwestern Oregon Community College, he focused his career on teaching others how to cook with the seasons, reduce food waste, and reconnect with what’s on their plate.
Michael keeps his cooking simple, sustainable, and full of flavor. His favorite part of the process? Watching people realize how easy and satisfying it can be to cook a single great meal from scratch.