
Cozy Hillbilly Pie (Poor Man’s Pie) Recipe: Rustic Comfort Food
Southern kitchens have a magical way of spinning hillbilly pie into something special when ingredients seem scarce.
Resourceful cooks learned generations ago how to craft delicious meals from minimal pantry supplies.
Generations of home bakers perfected this humble dessert using whatever sweet staples were available.
Rural families understood creating comfort food wasn’t about fancy ingredients but love and creativity.
Our simple recipe connects you to traditional cooking methods that celebrate making something wonderful from very little.
Grandmothers knew how to turn basic ingredients into memorable treats that could feed hungry families.
You’ll want to try this delightful dessert that proves deliciousness doesn’t require expensive components.
What Makes Hillbilly Pie a Classic Comfort Bake

Ingredients for This Simple, Satisfying Pie
Pie Crust:Filling Ingredients:Topping and Finishing:How to Bake Poor Man’s Pie Without the Fuss
Step 1: Prepare Oven and Pie Dish
Crank up the oven to 375°F (190°C). Gently place the pie crust into a 9-inch pie dish, lovingly crimping the edges to create a beautiful border.
Step 2: Create Magical Filling
Grab a mixing bowl and whisk together:Slowly pour in milk and vanilla extract, stirring until the mixture becomes silky smooth and free of lumps.
Step 3: Build Your Pie Masterpiece
Pour the dreamy filling into the waiting pie crust. Playfully dot the surface with tiny butter pieces, spreading them evenly across the top.
Step 4: Bake to Golden Perfection
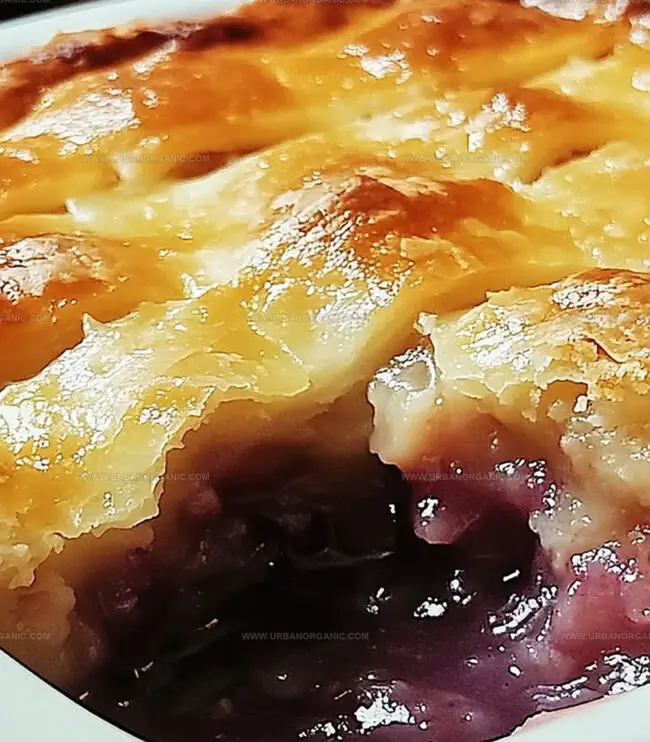
Slide the pie into the preheated oven. Bake for 40-45 minutes until the filling transforms into a gorgeous golden hue. The center might have a slight wiggle, but don’t worry – it’ll firm up as it cools down.
Step 5: Cool and Indulge
Patience is key! Let the pie rest for at least an hour. Slice and serve it warm or chilled. For extra indulgence, top with a cloud of whipped cream if you’re feeling fancy.
Pro Tips to Balance Sweet and Savory Flavors
Keep Hillbilly Pie Fresh with These Storage Tips
Dishes That Pair with Hillbilly Pie Perfectly
Ideas to Add More to Poor Man’s Pie
Hillbilly Pie – Your Questions Answered
A simple, budget-friendly dessert with a sweet custard-like filling made from basic pantry ingredients like sugar, milk, flour, and vanilla, traditionally popular during the Great Depression when resources were scarce.
Yes, it closely resembles a custard pie or chess pie, which are traditional Southern United States desserts known for their simple ingredients and rich, creamy texture.
Absolutely! This recipe is perfect for beginners because it requires minimal ingredients, basic mixing skills, and straightforward baking instructions with very little room for error.
The name reflects its origins during economic hardships, using affordable, readily available ingredients that could create a delicious dessert when fancy or expensive baking supplies were unaffordable.
Print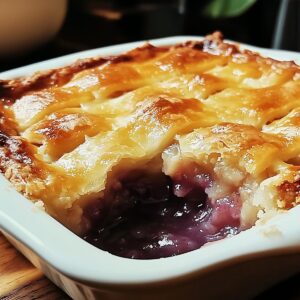
Hillbilly Pie (Poor Mans Pie) Recipe
- Total Time: 50 minutes
- Yield: 8 1x
Description
Hillbilly pie brings Southern comfort straight from Appalachian kitchens, blending simple ingredients into a hearty dessert. Warm spices and a rustic crust invite you to savor this delicious slice of traditional mountain heritage.
Ingredients
Main Ingredients:
- 1 cup whole milk
- 1 cup granulated sugar
- 4 tablespoons (¼ cup) unsalted butter, cut into small pieces
Pie Base:
- 1 unbaked pie crust (store-bought or homemade)
Enhancing Ingredients:
- 3 tablespoons all-purpose flour
- ½ teaspoon vanilla extract
- ½ teaspoon cinnamon (optional, for extra flavor)
- 1 pinch of salt
Instructions
- Prepare the oven environment by heating to 375°F (190°C), ensuring a consistent temperature for even baking.
- Carefully position the pie crust into a 9-inch pie dish, gently crimping the edges to create a decorative and secure border.
- Create a silky filling by whisking together dry ingredients – sugar, flour, and salt – to eliminate any potential lumps.
- Gradually incorporate milk and vanilla extract into the dry mixture, stirring continuously to achieve a smooth, homogeneous consistency.
- Transfer the liquid filling into the unbaked pie crust, ensuring an even distribution across the entire surface.
- Strategically place small butter pieces across the top of the filling, which will melt and enhance the pie’s richness during baking.
- Slide the pie into the preheated oven and bake for 40-45 minutes, watching for a golden-brown surface and a slightly firm texture.
- The center might display a subtle wobble, which is normal and will stabilize during the cooling process.
- Remove from the oven and allow the pie to rest for a minimum of one hour, enabling the filling to set completely.
- Serve the pie at your preferred temperature – either warm or chilled – and optionally garnish with a dollop of whipped cream for added indulgence.
Notes
- Use room temperature ingredients to ensure smooth, lump-free filling and even baking.
- Experiment with different milk types like almond or oat milk for dairy-free alternatives.
- Create a crispy crust edge by crimping with a fork or pinching edges decoratively.
- Add warm spices like cinnamon or nutmeg to enhance the pie’s comforting flavor profile.
- Prep Time: 10 minutes
- Cook Time: 40 minutes
- Category: Dinner, Snacks, Desserts
- Method: Baking
- Cuisine: American
Nutrition
- Serving Size: 8
- Calories: 580
- Sugar: 2 g
- Sodium: 650 mg
- Fat: 30 g
- Saturated Fat: 14 g
- Unsaturated Fat: 12 g
- Trans Fat: 0 g
- Carbohydrates: 48 g
- Fiber: 1 g
- Protein: 36 g
- Cholesterol: 115 mg
Jessica Martinez
Pastry Chef & Recipe Developer
Expertise
Organic Baking Techniques, Gluten-Free Recipe Development, Southwestern Dessert Specialties, Food Styling and Photography
Education
Santa Fe Community College (SFCC)
Jessica brings the sweet side to Urban Organic with her passion for baking and love for the Southwest. She trained at Santa Fe Community College and has built a career creating beautiful, gluten-free, and organic desserts that feel both nostalgic and new.
She believes baking should be fun, creative, and open to everyone, no matter your diet or skill level. Jessica’s recipes are simple enough to follow, but special enough to remember.