
Finger-Licking Easy BBQ Ribs Recipe for Summer Cookouts
Succulent bbq ribs have been my weekend obsession since discovering this knockout technique.
Friends constantly beg me to share my secret method.
Tender meat falling off the bone requires more than just random seasoning.
Each ingredient plays a crucial role in creating mouthwatering magic.
My grandmother’s whispered technique involves slow-cooking and patience.
Marinades matter enormously, blending spices that dance across your palate.
You’ll want to bookmark this recipe and become the neighborhood grill master.
Prepare to impress everyone at your next gathering.
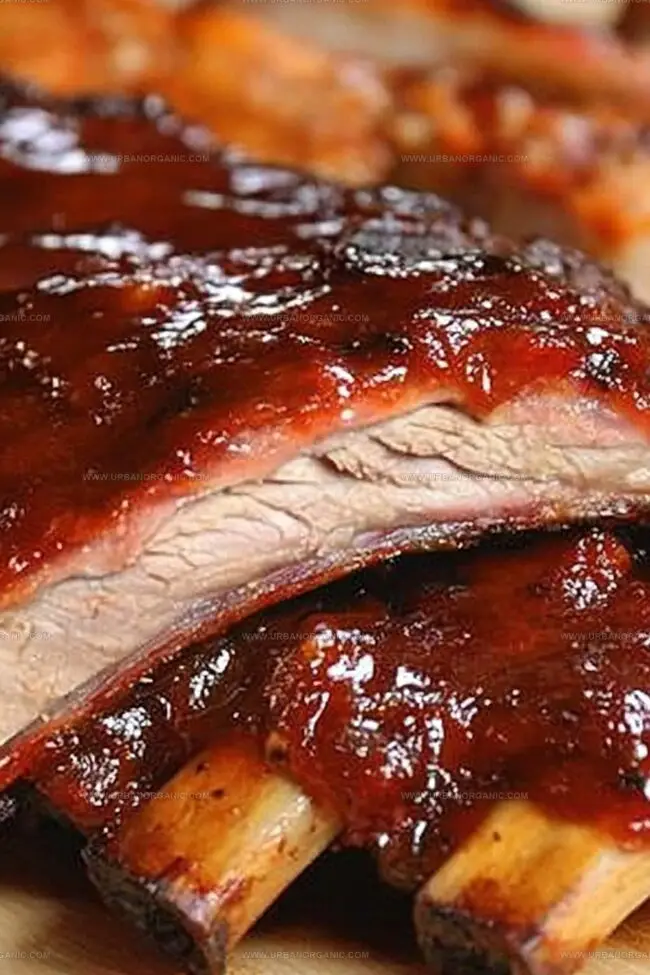
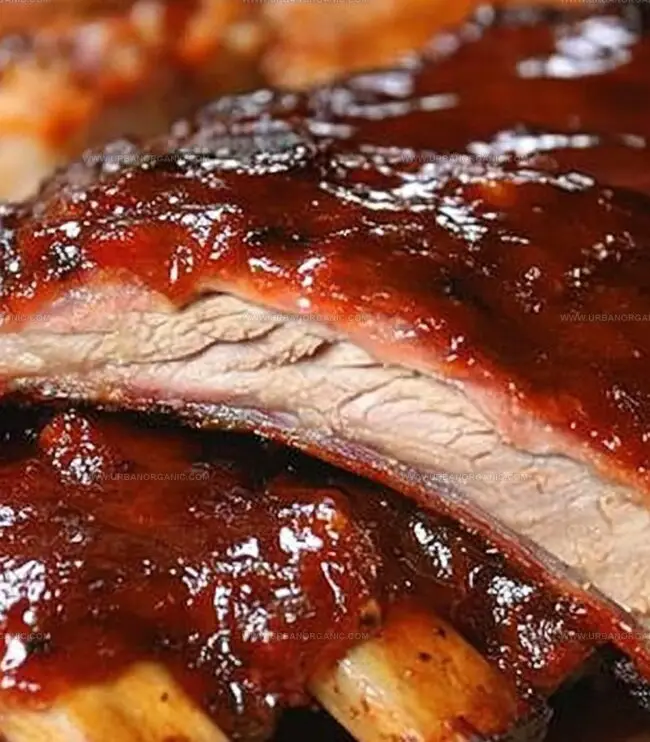
BBQ Ribs That Fall Off the Bone
Ingredients Needed for BBQ Ribs
Meat Base:Seasoning and Oil:Kitchen Essentials:How to Prepare BBQ Ribs in the Oven
Step 1: Prepare The Ribs
Remove the thin, tough membrane from the back of the ribs by sliding a knife under it and carefully peeling it off using a paper towel. This helps the seasonings penetrate the meat and creates a more tender final result.
Step 2: Season The Ribs
Create a base layer by massaging the ribs with:Press the dry rub firmly into the meat, ensuring even coverage on both sides. The oil helps the seasonings stick and creates a delicious crust during cooking.
Step 3: Preheat The Grill
Fire up your grill to create two cooking zones:Ensure your grill is clean and lightly oiled to prevent sticking.
Step 4: Wrap And Cook
Place the ribs bone-side down on the indirect heat zone. Cover the grill and cook slowly, maintaining a consistent temperature. After about 2-3 hours, wrap the ribs in aluminum foil with a splash of apple juice or beer to keep them moist.
Step 5: Finish With Sauce
During the last 30 minutes of cooking, unwrap the ribs and brush with barbecue sauce. Move them to the direct heat zone briefly to caramelize the sauce and create a slightly crispy exterior.
Step 6: Rest And Serve
Remove the ribs from the grill and let them rest for 10-15 minutes. This allows the juices to redistribute, ensuring each bite is tender and flavorful. Slice between the bones and serve hot.
Pro Tips for Juicy BBQ Ribs
How to Keep BBQ Ribs Tasting Great
Best Sides for BBQ Ribs
Ways to Switch Up BBQ Ribs
Frequently Asked Questions About BBQ Ribs
Removing the membrane helps the seasonings penetrate the meat and makes the ribs more tender. It also prevents a tough, chewy texture that can make eating ribs less enjoyable.
Yes, you can apply the dry rub to the ribs up to 24 hours before cooking and store them covered in the refrigerator. This allows the seasonings to deeply marinate the meat, enhancing the flavor.
A classic dry rub typically includes brown sugar, paprika, garlic powder, salt, black pepper, and cayenne pepper. The mix of sweet, spicy, and savory elements creates a delicious flavor profile for ribs.
No, you can make excellent BBQ ribs in an oven or on a standard grill. The key is maintaining a low, consistent temperature and allowing enough cooking time for the meat to become tender.
Print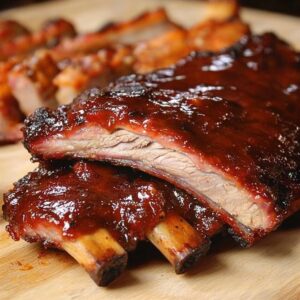
Easy Bbq Ribs Recipe
- Total Time: 3 hours 10 minutes
- Yield: 4 1x
Description
Sizzling BBQ ribs bring Kansas City’s smoky magic to backyard gatherings with mouthwatering tenderness and bold flavor. Hungry guests will devour these perfectly glazed, fall-off-the-bone ribs that promise pure grilling satisfaction.
Ingredients
Main Protein:
- 2 racks baby back ribs (or St. Louis-style ribs)
Dry Rub Spices:
- 2 tablespoons brown sugar
- 1 tablespoon smoked paprika
- ½ teaspoon smoked paprika
- 1 teaspoon salt
- 1 teaspoon black pepper
- 1 teaspoon garlic powder
- 1 teaspoon onion powder
- ½ teaspoon cayenne pepper (optional, for spice)
Additional Ingredients:
- 2 tablespoons olive oil
- 1 cup barbecue sauce
- 2 tablespoons honey (or maple syrup)
- 1 tablespoon apple cider vinegar
- 1 teaspoon Worcestershire sauce
Instructions
- Carefully loosen the tough membrane covering the back of the ribs using a small knife, gripping the edge with a paper towel and peeling it off in one smooth motion to ensure tender meat preparation.
- Massage the ribs generously with olive oil, creating a smooth surface that helps the seasoning adhere perfectly.
- Sprinkle the dry rub mixture across the entire surface of the ribs, using firm pressing motions to embed the spices deeply into the meat, ensuring maximum flavor penetration.
- Allow the seasoned ribs to rest at room temperature for 30 minutes, enabling the spices to infuse and the meat to absorb the robust flavors before cooking.
- Preheat the grill or oven to a consistent low temperature, around 275°F, preparing for a slow and gentle cooking process that will tenderize the meat.
- Wrap the ribs securely in aluminum foil, creating a sealed packet that traps moisture and allows the meat to steam and become exceptionally tender.
- Cook the wrapped ribs for approximately 2-3 hours, checking periodically to ensure even heat distribution and prevent overcooking.
- Unwrap the ribs during the final 15-20 minutes of cooking, brushing with barbecue sauce and allowing the exterior to caramelize and develop a delightful sticky glaze.
- Remove from heat and let the ribs rest for 10 minutes before slicing and serving, allowing the juices to redistribute throughout the meat.
Notes
- Peeling off the membrane ensures tender, easy-to-eat ribs that won’t be tough or chewy when cooked.
- Massaging olive oil helps the dry rub stick better and creates a delicious, caramelized exterior during grilling.
- For a low-carb option, swap traditional sugar-based BBQ rub with a keto-friendly spice blend using erythritol or monk fruit sweetener.
- Allow ribs to rest at room temperature for 30 minutes before cooking to help them cook more evenly and retain maximum moisture.
- Prep Time: 10 minutes
- Cook Time: 2.5-3 hours (oven) / 7-8 hours (slow cooker) / 2 hours (grill)
- Category: Dinner, Snacks
- Method: Roasting
- Cuisine: American
Nutrition
- Serving Size: 4
- Calories: 650
- Sugar: 15 g
- Sodium: 800 mg
- Fat: 30 g
- Saturated Fat: 10 g
- Unsaturated Fat: 18 g
- Trans Fat: 0 g
- Carbohydrates: 70 g
- Fiber: 1 g
- Protein: 35 g
- Cholesterol: 100 mg
Jessica Martinez
Pastry Chef & Recipe Developer
Expertise
Organic Baking Techniques, Gluten-Free Recipe Development, Southwestern Dessert Specialties, Food Styling and Photography
Education
Santa Fe Community College (SFCC)
Jessica brings the sweet side to Urban Organic with her passion for baking and love for the Southwest. She trained at Santa Fe Community College and has built a career creating beautiful, gluten-free, and organic desserts that feel both nostalgic and new.
She believes baking should be fun, creative, and open to everyone, no matter your diet or skill level. Jessica’s recipes are simple enough to follow, but special enough to remember.