
Adorable Easter Egg Oreo Cookie Balls Recipe for Sweet Treats
Crafting delectable easter egg oreo cookie balls brings pure joy to any sweet celebration.
Childhood memories flood back when blending classic cookies with creamy ingredients.
Decadent treats like these spark smiles across generations.
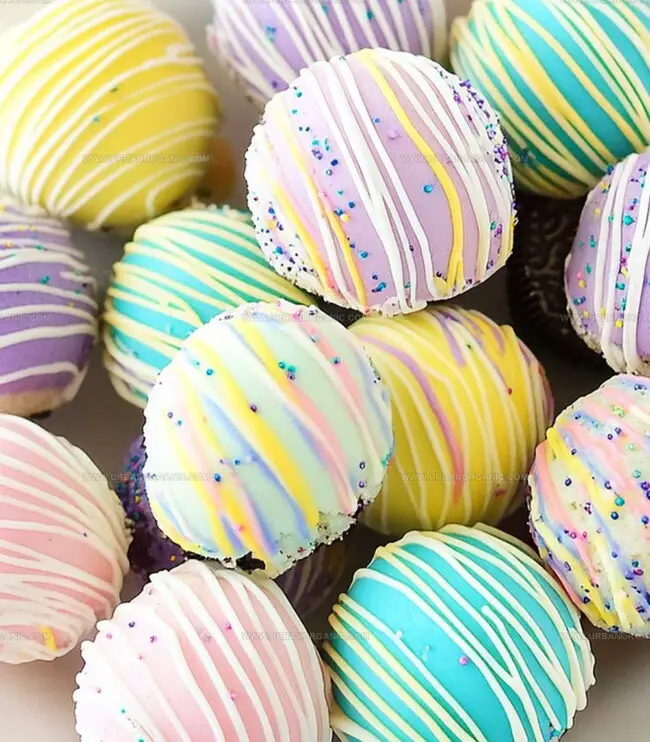
Smooth chocolate coating and playful egg shapes make these confections irresistible.
Rich flavors merge perfectly in each delightful bite-sized morsel.
Simple ingredients and minimal preparation time mean you can whip up these delightful sweets in minutes.
Indulge your dessert cravings and share these magical morsels with loved ones.
Why Kids and Adults Love Oreo Cookie Balls

What Goes in Easter Egg Oreo Cookie Balls
Base Ingredients:Coating and Decoration Ingredients:Optional Finishing Ingredients:How to Shape Oreo Cookie Balls with Style
Step 1: Crush Oreo Cookies
Place Oreo cookies in a food processor and pulse until finely ground into smooth crumbs.
Step 2: Create Creamy Mixture
Blend softened cream cheese into Oreo crumbs until a consistent dough forms.
Step 3: Sculpt Egg Shapes
Scoop mixture and roll into small egg-like shapes using hands. Place shaped eggs on parchment-lined baking sheet.
Step 4: Chill Cookie Eggs
Refrigerate egg shapes for 30 minutes until completely firm and solid.
Step 5: Prepare Candy Coating
Melt white candy melts in microwave or double boiler. Divide melted coating into separate bowls.
Step 6: Add Colorful Touches
Mix gel food coloring into different coating bowls to create pastel Easter colors:Step 7: Dip and Decorate
Carefully dip each chilled egg into colored candy coating, allowing excess to drip off. Place back on parchment paper.
Step 8: Add Festive Decorations
Sprinkle with:Step 9: Let Coating Set
Allow decorated eggs to harden at room temperature or speed process by placing in refrigerator for 10-15 minutes.
Step 10: Serve and Enjoy
Transfer cookie balls to serving platter and enjoy these delightful Easter treats.
Helpful Tips for Oreo Cookie Balls Success
Store and Reheat Oreo Cookie Balls Correctly
Fun Pairings for Oreo Cookie Balls
Fun Variations for Easter Egg Oreo Balls
Questions About Oreo Cookie Balls? Here You Go
Lightly grease your hands with cooking spray or wear disposable gloves to make shaping the Oreo eggs easier and prevent sticking.
Add a small amount of vegetable oil or coconut oil to thin out the candy melts, creating a smoother, more fluid coating for easier dipping.
Yes, you can prepare the Oreo eggs up to 3 days in advance. Keep them refrigerated in an airtight container until ready to serve.
Use gel food coloring to create pastel shades, or drizzle contrasting colors of melted candy over the base coat for a marbled or striped effect.
Print
Easter Egg Oreo Cookie Balls Recipe
- Total Time: 50 minutes
- Yield: 24 1x
Description
Delightful Easter Egg Oreo Cookie Balls bring a whimsical twist to classic dessert treats. Creamy chocolate and crushed Oreos combine in bite-sized eggs perfect for spring celebrations, tempting you to indulge in sweet, festive magic.
Ingredients
Main Ingredients:
- 36 Oreo cookies (Classic or Golden), crushed into fine crumbs
- 8 ounces (226 grams) cream cheese, softened
- 12 ounces (340 grams) white candy melts or white chocolate, melted
Decorative Ingredients:
- Gel food coloring (optional)
- Sprinkles or candy decorations (optional)
Instructions
- Pulverize the Oreo cookies into ultra-fine crumbs using a food processor, ensuring no large chunks remain.
- Blend the softened cream cheese into the cookie crumbs, kneading until a cohesive, moldable dough develops with a consistent texture.
- Gently shape the mixture into small egg-like forms, carefully rolling and compressing each piece to create smooth, uniform Easter egg shapes.
- Transfer the raw cookie eggs onto a parchment-lined baking sheet, maintaining slight separation between each piece.
- Chill the cookie eggs in the refrigerator for approximately 30 minutes, allowing them to firm up and retain their delicate egg contours.
- Melt the white candy coating using precise temperature control, stirring periodically to achieve a silky, lump-free consistency.
- Divide the melted coating into separate bowls and incorporate gel food coloring, creating desired pastel or vibrant hues.
- Delicately immerse each chilled cookie egg into the colored candy coating, ensuring complete coverage and allowing excess to drip away.
- Return the coated eggs to the parchment sheet, strategically adding sprinkles or decorative elements before the coating solidifies.
- Allow the candy shell to set completely at room temperature, or expedite the process by placing the tray in the refrigerator for 10-15 minutes.
Notes
- Keep cream cheese at room temperature to ensure smooth blending with Oreo crumbs, preventing lumpy texture.
- Use a cookie scoop or melon baller for uniform egg shapes, creating professional-looking treats.
- Freeze the Oreo mixture for 15 minutes before shaping to make handling easier and maintain structural integrity.
- Experiment with different Oreo flavors like mint, peanut butter, or birthday cake to create unique variations.
- Add a pinch of salt to enhance the overall flavor profile and balance the sweetness of the candy coating.
- Use gel food coloring instead of liquid to prevent the candy melts from seizing or becoming clumpy.
- Drizzle contrasting colored candy melts for decorative patterns and a more festive appearance.
- Store in an airtight container in the refrigerator for up to a week, making them perfect for advance preparation.
- Prep Time: 20 minutes
- Cook Time: 30 minutes
- Category: Desserts, Snacks
- Method: Blending
- Cuisine: American
Nutrition
- Serving Size: 24
- Calories: 150
- Sugar: 10 g
- Sodium: 90 mg
- Fat: 8 g
- Saturated Fat: 4.5 g
- Unsaturated Fat: 3.5 g
- Trans Fat: 0 g
- Carbohydrates: 19 g
- Fiber: 0.5 g
- Protein: 1.5 g
- Cholesterol: 15 mg
Jessica Martinez
Pastry Chef & Recipe Developer
Expertise
Organic Baking Techniques, Gluten-Free Recipe Development, Southwestern Dessert Specialties, Food Styling and Photography
Education
Santa Fe Community College (SFCC)
Jessica brings the sweet side to Urban Organic with her passion for baking and love for the Southwest. She trained at Santa Fe Community College and has built a career creating beautiful, gluten-free, and organic desserts that feel both nostalgic and new.
She believes baking should be fun, creative, and open to everyone, no matter your diet or skill level. Jessica’s recipes are simple enough to follow, but special enough to remember.