
Whip Up This Jolly Easter Chocolate Bark Recipe Today!
Sweet memories of childhood easter celebrations dance around this chocolate bark recipe that blends nostalgic flavors with playful creativity.
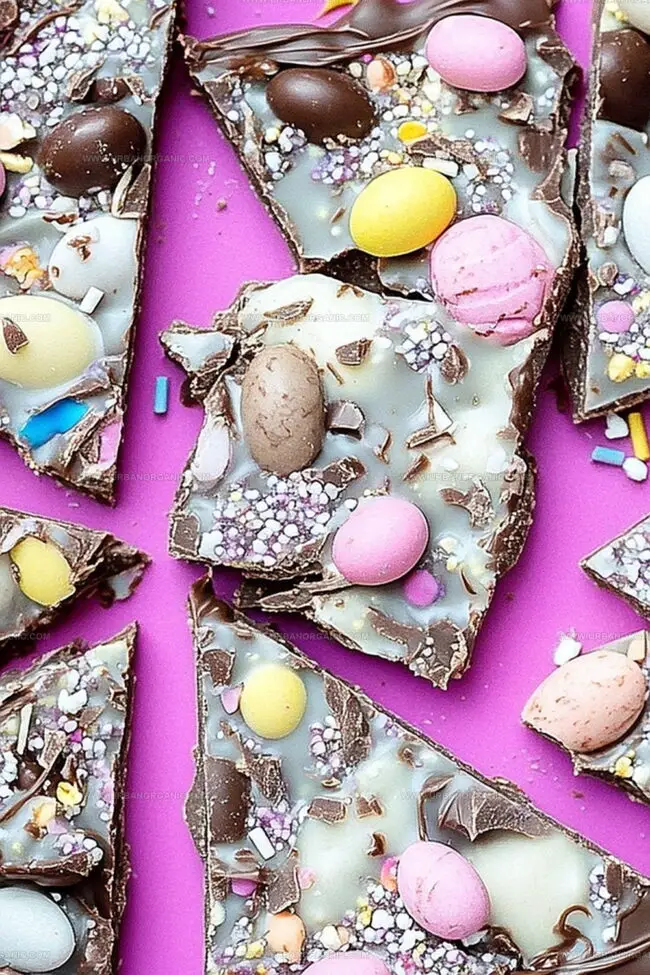
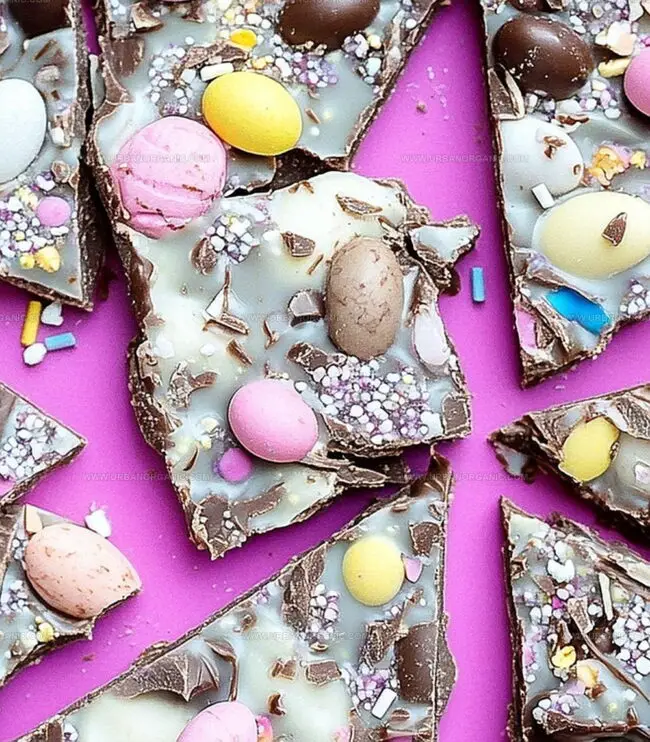
Colorful candy eggs and smooth chocolate create a delightful canvas for your culinary imagination.
Crisp chocolate layers invite spontaneous decorating adventures with sprinkles, nuts, and pastel-colored treats.
Seasonal ingredients combine effortlessly to craft a charming dessert perfect for spring gatherings.
Minimal kitchen skills work magic in crafting this impressive confection that looks professionally made.
Let you unleash your inner pastry artist and surprise everyone with this simple yet spectacular treat.
What Keeps Easter Chocolate Bark on Everyone’s Table
What You’ll Need for This Sweet Easter Bark Creation
Chocolate Base:White Chocolate Layer:Decorative Toppings:Walkthrough for Making Easter Chocolate Bark at Home
Step 1: Prepare Baking Surface
Line a 9×13 inch baking sheet with parchment paper or silicone mat, ensuring complete coverage with smooth edges.
Step 2: Melt Dark Chocolate
Break semi-sweet or milk chocolate into even pieces.
Use microwave method:Alternative stovetop method:Step 3: Melt White Chocolate
Follow identical melting process as dark chocolate, keeping chocolates separate.
Step 4: Create Chocolate Base
Pour melted dark chocolate onto prepared baking sheet.
Spread chocolate using offset spatula or back of spoon.
Aim for even layer approximately 1/4 inch thick.
Step 5: Design Marbled Pattern
Drizzle melted white chocolate across dark chocolate surface.
Use toothpick or knife tip to:Step 6: Add Decorative Touches
Sprinkle optional toppings:Step 7: Chill and Set
Place baking sheet in refrigerator.
Allow chocolate to harden completely (approximately 30 minutes).
Step 8: Break Into Pieces
Remove from refrigerator.
Lift parchment paper.
Crack bark into irregular chunks using hands or knife.
Tips That Take Easter Chocolate Bark Over the Top
Best Ways to Save and Reheat Easter Chocolate Bark Bites
What Goes Great with Easter Chocolate Bark Treats
Additions That Give Your Easter Chocolate Bark a New Look
FAQs for Easter Chocolate Bark Makers
Print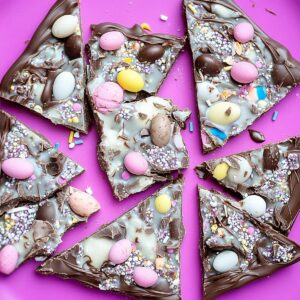
Easter Chocolate Bark Recipe
- Total Time: 1 hour 40 minutes
- Yield: 12 1x
Description
Delightful Easter Chocolate Bark brings festive cheer with its playful layers of rich chocolate and colorful spring decorations. Sweet morsels of joy dance across this simple treat, inviting family gatherings and creating delicious memories you’ll treasure.
Ingredients
Chocolate:
- 200 g (7 ounces) semi-sweet chocolate, chopped
- 200 g (7 ounces) white chocolate, chopped
Toppings:
- 1 cup pastel-colored candy-coated chocolates
- ¼ cup mini chocolate eggs or jelly beans
- ¼ cup colorful sprinkles
- ¼ cup pretzel pieces
- ½ cup mini marshmallows
- 2 tablespoons shredded coconut
Instructions
- Prepare a 9×13 inch baking surface by laying down a protective non-stick liner, ensuring complete coverage of the pan’s base.
- Carefully melt semi-sweet or milk chocolate using gentle microwave pulses, stirring between each 30-second interval until the chocolate transforms into a silky, uniform liquid. Alternatively, utilize a double boiler technique for smoother melting.
- Repeat the melting process with white chocolate in a separate vessel, maintaining careful temperature control to prevent scorching.
- Gently cascade the molten semi-sweet or milk chocolate across the prepared surface, using a flexible spatula to distribute the chocolate evenly, creating a smooth layer approximately one-quarter inch thick.
- Artfully drizzle the liquefied white chocolate overtop the dark chocolate foundation, creating an elegant, free-flowing pattern.
- Employ a delicate implement like a toothpick or thin knife to weave through the two chocolate layers, generating an intricate marbled design with graceful, interconnected swirls.
- Allow the chocolate creation to rest and solidify at room temperature or expedite the cooling process by placing the sheet in the refrigerator until completely set and firm.
Notes
- Prevent Chocolate Seizing: Always use completely dry utensils and avoid water contact when melting chocolate to maintain smooth, glossy texture.
- Temperature Control: Melt chocolate slowly at low heat to prevent burning, stirring consistently for even melting and perfect consistency.
- Customization Options: Experiment with different chocolate types like dark, milk, or vegan chocolate alternatives to suit dietary preferences or taste.
- Decorative Enhancements: Sprinkle crushed nuts, colorful sprinkles, or seasonal candies on top before chocolate sets for extra crunch and visual appeal.
- Prep Time: 10 minutes
- Cook Time: 1 hour 30 minutes
- Category: Snacks, Desserts
- Method: Baking
- Cuisine: American
Nutrition
- Serving Size: 12
- Calories: 250
- Sugar: 30 g
- Sodium: 50 mg
- Fat: 12 g
- Saturated Fat: 7 g
- Unsaturated Fat: 4 g
- Trans Fat: 0 g
- Carbohydrates: 35 g
- Fiber: 1 g
- Protein: 2 g
- Cholesterol: 5 mg
Jessica Martinez
Pastry Chef & Recipe Developer
Expertise
Organic Baking Techniques, Gluten-Free Recipe Development, Southwestern Dessert Specialties, Food Styling and Photography
Education
Santa Fe Community College (SFCC)
Jessica brings the sweet side to Urban Organic with her passion for baking and love for the Southwest. She trained at Santa Fe Community College and has built a career creating beautiful, gluten-free, and organic desserts that feel both nostalgic and new.
She believes baking should be fun, creative, and open to everyone, no matter your diet or skill level. Jessica’s recipes are simple enough to follow, but special enough to remember.