
DIY Peppermint Candy Spoons Recipe for Sweet Sips
Crafting a delightful diy peppermint candy spoon promises a whimsical kitchen adventure that sparks creativity.
Sweet and festive, these edible utensils bring magic to hot cocoa and dessert presentations.
Melted candy transforms ordinary spoons into extraordinary treats perfect for holiday gatherings.
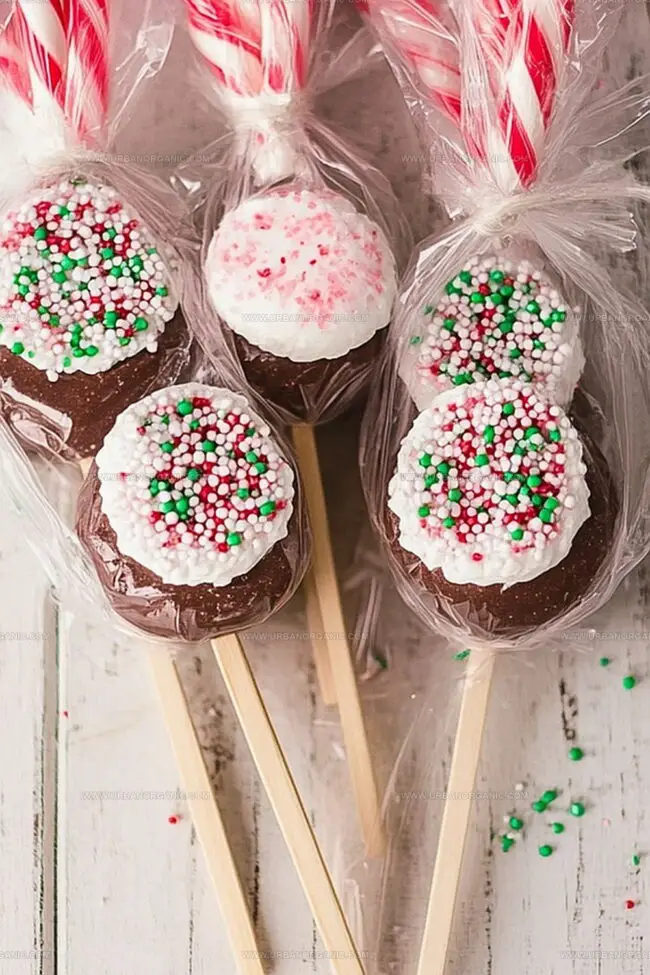
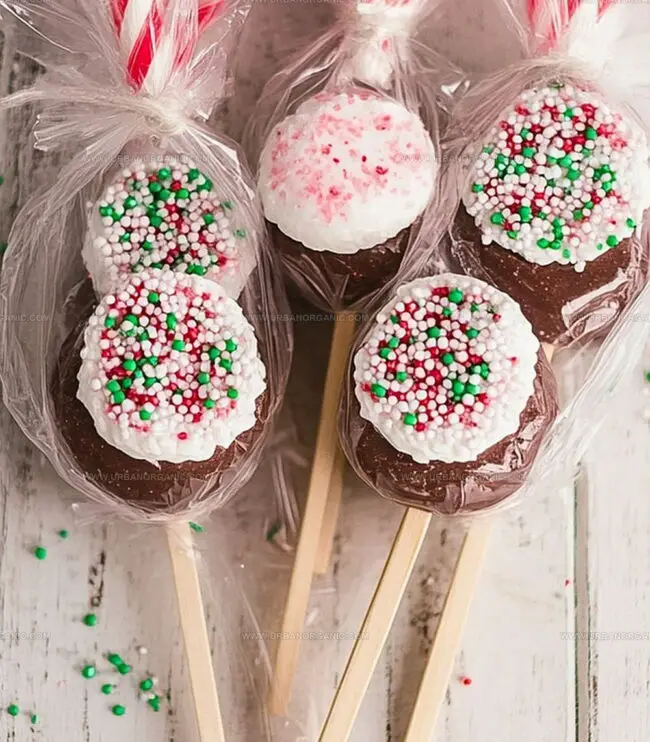
Colorful peppermint swirls create eye-catching accessories that guests will adore and children will marvel at.
Minimal ingredients and simple techniques make this project accessible for crafters of all skill levels.
Chocolate lovers and baking enthusiasts can easily personalize these charming confections with different color combinations and decorative touches.
You will definitely impress everyone at your next celebration with these delectable, handmade masterpieces.
Why You’ll Want to Try the DIY Peppermint Candy Spoons Recipe
Peppermint Candy Spoon Ingredients You’ll Need
Main Ingredients:
Peppermint Candies:- Peppermint Candies: Classic red and white striped hard candies that provide the signature flavor and structure of the spoons. Best when using fresh, uniform candies without moisture.
Cooking Spray:- Cooking Spray: Helps prevent sticking and ensures easy removal of candy spoons from the silicone mold. Non-stick varieties work best.
Optional Decorative Ingredients:
Chocolate:- Chocolate: Adds a rich, complementary flavor and creates a decorative coating for the candy spoons. Dark or milk chocolate work well.
Sprinkles:- Sprinkles: Provides festive visual appeal and extra texture to the finished candy spoons. Holiday or seasonal sprinkles add a special touch.
Baking Equipment:
Silicone Spoon Mold:- Silicone Spoon Mold: Special kitchen tool that gives the unique spoon shape to the melted candy. Must be heat-resistant and food-grade quality.
Rolling Pin:- Rolling Pin: Used for crushing peppermint candies into small, manageable chunks. A heavy pin works best for consistent crushing.
Baking Sheet:- Baking Sheet: Provides stable support for the silicone mold during baking and catches any potential candy drips.
Zip-Top Bag:- Zip-Top Bag: Convenient tool for crushing candies without making a mess. Helps control the size of candy pieces.
How to Make Peppermint Candy Spoons from Scratch
Step 1: Prepare Baking Station
Warm your oven to 300F. Grab a silicone spoon mold and lightly coat with cooking spray to ensure smooth release.
Step 2: Smash Candy Treats
Toss peppermint candies into a sturdy zip-top bag. Use a rolling pin to transform candies into delightful small chunks, avoiding powdery texture.
Step 3: Create Candy Spoon Shapes
Carefully sprinkle crushed candy pieces into each mold cavity:Step 4: Melt and Transform
Place mold on a baking sheet and slide into preheated oven. Watch closely as candy melts and bubbles, typically taking around 8 minutes. Prevent burning by keeping a watchful eye.
Step 5: Cool and Release
Allow candy spoons to completely solidify in the mold. Gently pop out the finished treats, revealing glossy peppermint utensils.
Step 6: Add Festive Flair
Optional decorating ideas:Let decorations set before serving or packaging.
Candy Spoon Tips for Perfect Peppermint Results
How to Keep Peppermint Candy Spoons Fresh
What Drinks Go Well with Peppermint Candy Spoons
Peppermint Candy Spoon Variations to Explore
FAQs for Peppermint Candy Spoons You Should See
Yes, these spoons are designed to melt slowly in hot beverages like coffee or hot chocolate, adding a sweet peppermint flavor as they dissolve.
Hard peppermint candies like starlight mints or candy canes are ideal. Avoid soft or chewy peppermint candies as they won’t maintain the spoon shape.
While a silicone spoon mold is recommended for best results, you can try using a metal spoon as a mold or create free-form shapes on a silicone baking mat.
When stored in an airtight container in a cool, dry place, these peppermint candy spoons can last up to 2 weeks without losing their shape or flavor.
Print
Diy Peppermint Candy Spoons Recipe
- Total Time: 18 minutes
- Yield: 12 1x
Description
Homemade peppermint candy spoons bring delightful holiday magic to dessert presentations. Sweet peppermint goodness melts into classic silverware, creating charming festive serving tools perfect for winter celebrations.
Ingredients
Peppermint Candies:
- 1 bag (12 ounces/340 grams) peppermint hard candies (crushed)
Preparation Aids:
- Cooking spray (for greasing the molds)
Decorative Toppings:
- Melted white chocolate
- Melted dark chocolate
- Crushed candy canes
- Holiday sprinkles
Instructions
- Prepare the baking environment by heating the oven to 300F (150C) and lightly coating a silicone spoon mold with cooking spray to ensure easy candy removal.
- Transform peppermint candies into small, irregular chunks by placing them in a sealed plastic bag and gently crushing with a rolling pin, avoiding powdery consistency.
- Carefully distribute the crushed candy pieces into each cavity of the silicone mold, pressing the fragments into every corner to create a uniform and complete spoon shape.
- Position the filled mold onto a baking sheet, then slide into the preheated oven and monitor the melting process for approximately 5-8 minutes until the candy becomes completely liquefied and smoothly blended.
- Once the candy has transformed into a glossy, molten state, carefully remove the baking sheet from the oven and allow the spoons to cool entirely within the mold, ensuring complete solidification.
- Gently release the hardened peppermint spoons from the silicone mold, checking for any imperfections or uneven edges.
- Enhance the festive appearance by drizzling melted chocolate over the spoons and sprinkling additional crushed peppermint or decorative sprinkles, then permit the embellishments to set completely before serving or packaging.
Notes
- Choose candies with pure sugar content for clearer, more transparent spoons without cloudiness.
- Experiment with different mint candy colors to create vibrant, eye-catching designs for holiday gatherings.
- Avoid overfilling molds to prevent messy overflow and ensure clean, sharp spoon edges during baking.
- Store completed candy spoons in a cool, dry place to maintain their crisp texture and prevent sticky softening.
- Prep Time: 10 minutes
- Cook Time: 8 minutes
- Category: Desserts, Snacks
- Method: Baking
- Cuisine: American
Nutrition
- Serving Size: 12
- Calories: 80
- Sugar: 15 g
- Sodium: 0 mg
- Fat: 0 g
- Saturated Fat: 0 g
- Unsaturated Fat: 0 g
- Trans Fat: 0 g
- Carbohydrates: 20 g
- Fiber: 0 g
- Protein: 0 g
- Cholesterol: 0 mg
Jessica Martinez
Pastry Chef & Recipe Developer
Expertise
Organic Baking Techniques, Gluten-Free Recipe Development, Southwestern Dessert Specialties, Food Styling and Photography
Education
Santa Fe Community College (SFCC)
Jessica brings the sweet side to Urban Organic with her passion for baking and love for the Southwest. She trained at Santa Fe Community College and has built a career creating beautiful, gluten-free, and organic desserts that feel both nostalgic and new.
She believes baking should be fun, creative, and open to everyone, no matter your diet or skill level. Jessica’s recipes are simple enough to follow, but special enough to remember.