
Soft Chocolate Snowball Cookies Recipe for Sweet Winter Magic
Nibbling on these delightful chocolate snowball cookies transports you to a winter wonderland of sweet memories.
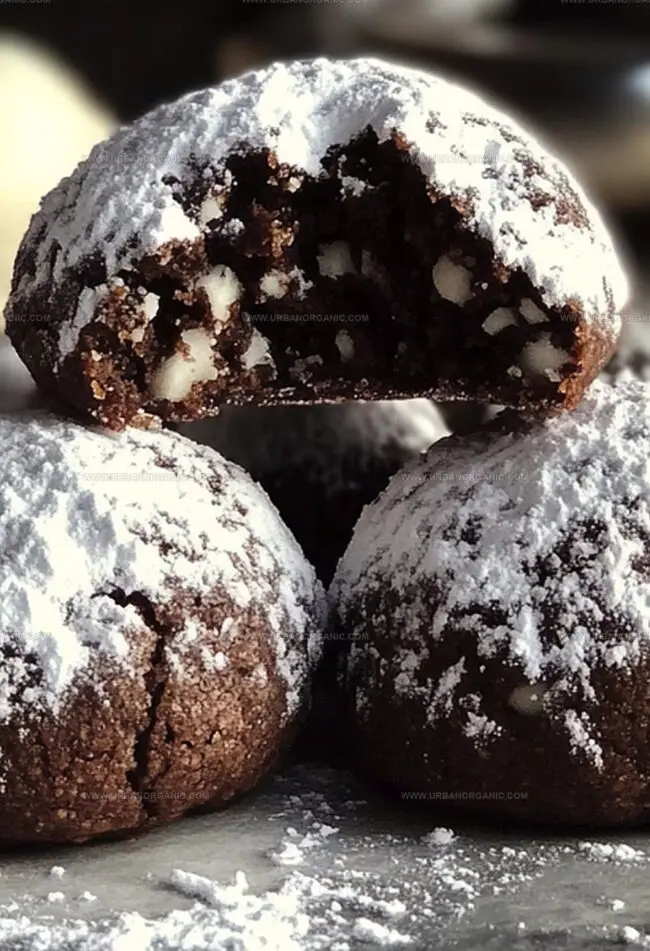
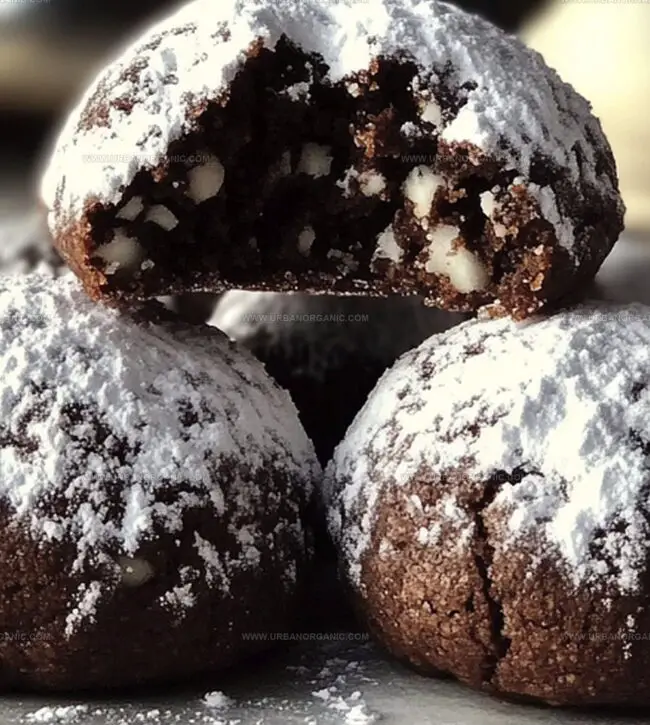
Powdery sugar coats each morsel like pristine mountain peaks.
Crisp edges crunch softly beneath delicate layers of rich cocoa goodness.
Kids and adults alike adore these melt-in-your-mouth treats that sparkle with festive charm.
Effortless to prepare, these cookies demand minimal ingredients but deliver maximum flavor.
Chocolate lovers will swoon over the subtle nutty undertones and velvety texture.
Trust me, one bite and you’ll be enchanted by these irresistible winter delights.
Dust off your baking skills and let’s create some magic together!
Chocolate Snowball Cookies Everyone’s Sharing This Season
Ingredients That Go into Chocolate Snowball Cookies
Main Cookie Ingredients:
Flour Ingredients: – All-Purpose Flour, Cocoa Powder: Essential for creating the rich chocolate base and providing structure to the cookie, with cocoa adding deep chocolate flavor.
Fat and Sweetener Ingredients: – Butter, Powdered Sugar: Butter creates a tender, melt-in-your-mouth texture while powdered sugar provides sweetness and helps achieve a soft cookie consistency.
Flavor Enhancers:Optional Add-In:Coating Ingredient:How to Bake the Perfect Chocolate Snowball Cookies
Step 1: Prepare Baking Space
Warm up the oven to 350F (175C). Cover two baking sheets with parchment paper or silicone mats.
Step 2: Create Creamy Base
In a large bowl, whip butter and powdered sugar until silky smooth. Blend in vanilla and salt thoroughly.
Step 3: Incorporate Dry Ingredients
Gradually fold in:Mix until dough forms a consistent texture.
Step 4: Form Cookie Rounds
Scoop small portions of dough and roll into delicate balls. Arrange on prepared baking sheets, leaving space between each cookie.
Step 5: Bake to Perfection
Slide cookies into the oven. Bake for 10-12 minutes until edges look set but not darkened.
Step 6: First Sugar Coating
After removing from oven, let cookies rest for 5 minutes. While still warm, gently roll each cookie in powdered sugar.
Step 7: Final Snowy Touch
Once completely cooled, roll cookies in powdered sugar again for a beautiful winter-like finish.
Smart Tips for Fluffy Chocolate Snowball Cookies
Storing and Warming Chocolate Snowball Cookies Without the Crumble
What to Pair with Chocolate Snowball Cookies
Chocolate Snowball Cookie Variations Worth Trying
FAQs About Chocolate Snowball Cookies
The cocoa powder and butter create a deep, intense chocolate taste, while optional chopped nuts add extra texture and depth to the cookie.
These cookies are super easy to prepare, requiring basic mixing and rolling techniques that even beginner bakers can master quickly.
Absolutely! The recipe is flexible, and you can easily skip the nuts without affecting the overall texture and taste of the chocolate snowball cookies.
Roll the cookies in powdered sugar while they’re still slightly warm, then repeat the sugar coating after they’ve completely cooled to achieve that classic snowy white appearance.
Print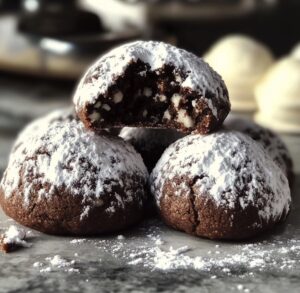
Chocolate Snowball Cookies Recipe
- Total Time: 27 minutes
- Yield: 24 1x
Description
Sweet, powdery chocolate snowball cookies bring winter magic to holiday dessert tables. Delicate Mexican wedding cookie descendants crumble with rich cocoa charm, inviting chocolate lovers to savor each delightful, sugar-dusted bite.
Ingredients
Main Ingredients:
- 2 cups (250 g) all-purpose flour
- 1 cup (230 g) unsalted butter, softened
- ¼ cup (25 g) unsweetened cocoa powder
Flavor and Binding Ingredients:
- ½ cup (60 g) powdered sugar
- 1 teaspoon vanilla extract
- ¼ teaspoon salt
- ¾ cup (90 g) finely chopped pecans or walnuts (optional)
Coating Ingredients:
- 1 cup (120 g) powdered sugar
Instructions
- Calibrate oven temperature to 350F (175C) and prepare baking surfaces with parchment paper or silicone mats.
- Blend softened butter and powdered sugar in a mixing bowl, creating a smooth, creamy consistency through thorough mixing.
- Incorporate vanilla extract and salt into the butter mixture, ensuring even distribution.
- Gradually fold flour, cocoa powder, and chopped nuts into the mixture, gently working until a cohesive dough forms.
- Portion the dough into tablespoon-sized segments, carefully rolling each into uniform spherical shapes.
- Arrange cookie balls on prepared baking surfaces, maintaining approximately one-inch spacing between each.
- Transfer baking sheets to preheated oven and bake for 10-12 minutes, watching for set texture without achieving browning.
- Remove cookies from oven and allow initial cooling on baking sheets for five minutes.
- While cookies remain slightly warm, delicately coat each in powdered sugar, ensuring complete coverage.
- Transfer sugar-coated cookies to wire cooling rack, permitting complete temperature reduction.
- Once fully cooled, perform a second powdered sugar coating to create a pristine, snow-like exterior.
Notes
- Butter temperature matters: Use room-temperature butter for smoother, easier mixing that creates a perfectly tender cookie texture.
- Nut flexibility: Swap chopped pecans or walnuts based on preference, or omit entirely for a nut-free version that’s equally delicious.
- Cocoa powder selection: Choose high-quality Dutch-processed cocoa for deeper, richer chocolate flavor and more intense color.
- Storage secret: Keep cookies in an airtight container at room temperature for up to a week, separating layers with parchment paper to prevent sticking and preserve their delicate powdered sugar coating.
- Prep Time: 15 minutes
- Cook Time: 12 minutes
- Category: Desserts, Snacks
- Method: Baking
- Cuisine: American
Nutrition
- Serving Size: 24
- Calories: 406
- Sugar: 30 g
- Sodium: 212 mg
- Fat: 32 g
- Saturated Fat: 19 g
- Unsaturated Fat: 9 g
- Trans Fat: 0 g
- Carbohydrates: 31 g
- Fiber: 1 g
- Protein: 4 g
- Cholesterol: 83 mg
Jessica Martinez
Pastry Chef & Recipe Developer
Expertise
Organic Baking Techniques, Gluten-Free Recipe Development, Southwestern Dessert Specialties, Food Styling and Photography
Education
Santa Fe Community College (SFCC)
Jessica brings the sweet side to Urban Organic with her passion for baking and love for the Southwest. She trained at Santa Fe Community College and has built a career creating beautiful, gluten-free, and organic desserts that feel both nostalgic and new.
She believes baking should be fun, creative, and open to everyone, no matter your diet or skill level. Jessica’s recipes are simple enough to follow, but special enough to remember.